
GW2. A complete achievements guide for The Twisted Marionette. Old and new achievements.

Total achievements: 20 – 179AP
The Twisted Marionette
Getting Started
To enter the instance, go to Eye of the North Waypoint – [&BAkMAAA=] and head to where the Charr Helicopter is, and talk with the Mist Stranger NPC. You will get the option to join the squad version of the Twisted Marionette. (The public version is only available every 2 hours, starting at daily reset for reference). Check the LFG tool to find groups under Central Tyria or World Bossed category. (The option to join Public only shows when it’s on timer)


Compositions
The Twisted Marionette is recommended to run with at least 25 players in private squad because there are 5 lanes and each lane needs at least 5 players, but players can rotate between lanes to allow squads of smaller sizes. The maximum squad size is 50.
As the marionette was designed before Heart of Thorns where more trinity based roles arose, this fight does not require any kind of support builds like that. In fact, it is suggested you play a self sufficient build that can survive while also doing decent damage because you can get split up from your team during boss phases and your support build will not be able to kill the boss unless other DPS players get in with you. Here are some suggested things to bring in your build:
- Single target damage is mostly required. AoE damage is good for the laning phase, but mostly single target damage is needed because there are champions and bosses that require more attention.
- Stun breaks and self healing are important for the boss fights because even though you are separated from your group, if you wipe your entire lane fails their boss attempt.
- CC is important because some of the mechanics of the bosses are dealt with by breaking their bar.
- Flexibility is important because you don’t know which boss you may get and some of the bosses counter melee, some of them counter ranged classes. Be able to do both!
When you are ready to enter into the Marionette, divide your squad into 5 groups relatively evenly and players in that numbered group should go to the corresponding lane number seen on the map.
Credit to Vallun for the video.Lane & Boss Phases
The entire encounter has two main phases. One is a phase of defending your lane against waves of enemies. The other is going into the boss encounter.
The objective of the Lane Phase is to prevent as many champion mobs from getting to the portal as possible. They will charge the Aethercannon slightly if they make it through. You can slow them down by taking repair hammers and building barricades or by breaking their bar. Other than killing the champions, this phase is very low impact.

The phase that really matters is the Boss Phase. While 4 of the lanes are killing champions, one of the lanes at a time will have a boss attempt. When it is that lane’s turn to fight the boss, the minions will leave and everyone should enter the portal. They will be split into 5 different boss fights and cannot interact with the other lanes other than finishing theirs first which allows them to use the special action key to give boons to the others. There are specific mechanics that each individual boss will do, but generally you want to avoid any of the AoEs, by timing your dodge or positioning and then doing damage. Once the boss is finished, kill the Regulator to finish 1/5 of your lanes boss fight. If all 5 bosses and regulators are finished, your lane succeeds and a chain will be broken from the Marionette. Once 5 chains are broken, the fight is won. If you fail to break the chain, you will be punished with giving extra charge to the Aethercannon and will not progress the fight.
After each boss phase, players who participated will get a debuff for around 7 minutes preventing them from entering the portal to another boss fight. The debuff is long enough that they will not be able to do the next 2 or 3 boss attempts depending on how fast each lane is. So if you do lane 1, you can rotate to lane 4 or 5 to help out as soon as possible on the boss. Lane 2 can help on 5 or 1, and 3 can help on 1 or 2.
Boss Mechanics
There are 5 unique Bosses you will need to know the mechanics of to beat them within 2 minutes. Each boss will have the actual Marionette interfering with the fight, swiping all platforms. You will have to dodge the orange AoEs that cover the platform after a second. Look out at the Marionette to know the timing. You can also revive downed allies in other platforms if you finish your regulator before them. You will gain a special action key ability which when cast will revive downed allies and give them boons. Don’t just spam this, wait to watch if any of them down. It has a 2,500 range so you can hit any of the platforms.

Regulator Warden I (One)
This boss will block all attacks that hit it from the front. You can see where it is facing from the arrow indicator on the ground. The player who has aggro on the boss can stand still so that others have an easier time hitting it from behind, but make sure you can survive while doing that. There are also mobs that spawn that can add more pressure to the fight. The person tanking the boss can kill those while the others hit the boss from behind. Pets or minions can be used to gain the attention of the boss so you can hit it from behind. You can also break the boss’s defiance bar to allow you to get behind it momentarily for burst damage.


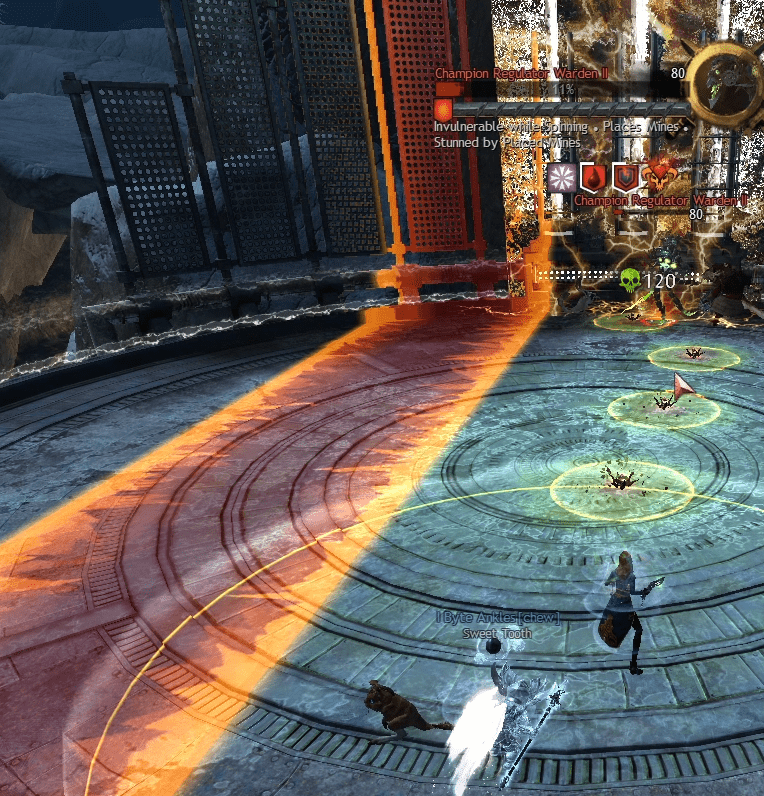
Regulator Warden II (Two)
This boss will spin around and deal damage anyone in it’s path while also being invulnerable. To get the boss vulnerable you will need to lure it over the mines it drops and then burst it while it is stunned. You may think to avoid the mines, but you need to be near them so the boss lands on them or you cannot kill it.


Regulator Warden III (Three)
This boss is very ranged class favored. It is slow and easy to kite while having lots of melee range pressure. There are going to be many AoEs on the ground while will CC you, allowing the boss to catch up and annihilate you. Having a stun break on your bar will be very useful. Keep your distance and avoid the AoEs and break the defiance bar to be able to damage it safely.


Regulator Warden IV (Four)
This boss spawns AoE either in the center of the room or in the outer circle. If the AoE is in the center you will want some ranged options to be able to still damage the boss. When it is in the outer circle you will need to stay close to the boss which makes it harder to avoid the homing missle. The homing missile can be kited if you run at full speed away from it, but you can also tank the missile by using defensive cooldowns.


Regulator Warden V (Five)
The fifth warden will charge in a line towards its target and knock them. You want to rotate around them so they have a hard time charging at you. When the warden dies it will split into 2 smaller halves, and when those die they will split into smaller versions as well. These splits will also perform the charge attacks so keep moving. AoE damage is really necessary to cleave out the splits later on in this fight so make sure you aren’t stuck on a build with all single target damage. Bring some stun breaks. The splits will not have a break bar, so they can be easily dealt with by CC and blinds.


Overall Strategy
The point of this world boss encounter is to break 5 chains before the Aethercannon is fully charged. When one lane succeeds the Warden Boss, the fight is progressed and Aethercannon energy is denied so focus on succeeding the boss fights rather than anything else. Because so much emphasis is placed on succeeding the Wardens, you can place your most competent and confident players in the first few lanes and the less confident players later on. That way you can for sure succeed the first few chains which is great for your team’s morale, and maybe fail one or two attempts but by then the debuff is off and you can go in again. Even though you want to split your squad evenly between the lanes, you want to siphon a few from each lane to zerg the current boss if possible. For example, a squad of 25 should put 10 on the current boss lane and 3 or 4 in all the other lanes. The best strategy is to rotate and zerg like this to ensure that the Warden phases go as smoothly as possible which is the most important thing.
An extra tip, you can use the Powerful Potion of Slaying Scarlet’s Armies utility food for extra damage and defense, cheap to buy from Trading Post.

You can also cheese it by doing a 50 Scourge squad as shown on this video:
Achievements
The Origins of Madness – 135AP
The Origins of Madness Completionist – 50AP
This is meta achievement, you need to complete all 11 achievements from this category. The reward is a Sprocket Generator node for your home instance and 50 AP.


Energy Probe Defender Slayer – 8AP
Originally this achievement was related to open world events, but they are gone now, currently you can obtain this by defeating 50 attackers during the lane defense phase on the Marionette event.
Energy Probe Dismantler – 5AP
Same as above, the energy probe events aren’t active anymore, but you can obtain this by interacting with the energy probe wreckage on 5 different maps, they are on many maps but I will list five of them to make it quick.
- Bloodtide Coast – Stormbluff Waypoint – [&BKUBAAA=]


- Gendarran Fields – Broadhollow Waypoint – [&BOEAAAA=]


- Kessex Hills – Ireko Tradecamp Waypoint – [&BAoAAAA=]


- Harathi Hinterlands – Grey Gritta’s Waypoint – [&BKkAAAA=]


- Snowden Drifts – Valslake Waypoint – [&BMADAAA=]


Marionette Defender – 10AP
To earn this achievement you need to participate on each of the five lane defense events (marionette portal defense events)


Marionette Deregulator – 10AP
Defeat each one of the five wardens to earn this achievement, each lane have a different warden boss, check above on the guide section to know more. Sadly the achievement won’t tell you which one you are missing so try to run a different lane every run.
Marionette Dismisser – 1AP
Right after you defeat the Marionette use the emote /cheer to earn this achievement.
Marionette Lightfoot – 5AP
Avoid being hit by the Twisted Marionette’s stomp even once during an assault on its power regulators. This happens during the Warden I (One) fight so when 0 chains have been severed. Watch her movement as she stomps across each platform one at a time.


Marionette Sidestepper – 5AP
Avoid being hit by the Twisted Marionette’s high kick even once during an assault on its power regulators. This occurs during the Warden II (Two) fight which means 1 chain has been severed. There is a long orange line that is thin and easy to avoid.

Marionette Short-Circuiter – 5AP
Avoid the Twisted Marionette’s lightning attack during an assault on its power regulators. This occurs during the Warden III (Three) fight so when 2 chains have been severed. Watch for when the Marionette approaches your platform and then avoid the orange circles immediately.


Marionette Dodger – 10AP
Avoid getting hit by the Twisted Marionette’s sword attack even once during an assault on its power regulators. This occurs during the Warden IV (Four) fight, so you want to go into the boss when 3 chains have been severed. Watch for the orange circles that cover most of the platform, then look at the marionette to know the exact timing, it can be a bit unintuitive.


Marionette Muter – 10AP
Avoid being hit by the Twisted Marionette’s scream attack even once during an assault on its power regulators. This occurs during the Warden V (Five) fight which is when 4 chains have been severed. There will be a scattered orange circle animation to show this attack, then projectiles will be shot at the areas.


Marionette Tangler – 10AP
Successfully defeat Scarlet’s marionette for the first time and you will earn this achievement.
The Secret Lair – 1AP
For this achievement you need to discover Scarlet Briar’s secret lair in Lornar’s Pass. Start from Durmand Priory Waypoint – [&BOkAAAA=] and head north, enter the cave and follow the path to the left side. You will see a wall which you can go through, you will see the entrance to the secret lair. Check the images below for more references:


Vigil Field Supporter – 5AP
To earn this achievement you need to participate on each of the three escort events of the Triple Trouble world boss that starts at Firthside Vigil Waypoint – [&BKoBAAA=] . The event happens every 3 hours, check out the timer to know when it starts and check the Central Tyria Squad LFG to find a group/squad (usually check 30 minutes before to find taxi to the map).

Revenge of the Marionette – 44AP
Master of the Marionette – 20AP
This is the meta achievement, you need to complete all 5 achievements from this category. The reward is an Energy Regulator Cog ascended ring and 20 AP.


Champion Deregulator – 5AP
For this achievement you need to defeat a total of 10 Warden Bosses, you get a debuff after killing one preventing you to go another lane instantly, but you might be able to do multiple wardens on the same run.
Split Defense – 5AP
Same as Marionette Defender you need to participate in 10 Twisted Marionette portal defense events.
Good-bye Again – 1AP
Right after you defeat the Marionette use the emote /wave to earn this achievement.
Watchwork Wrecker – 10AP
Successfully defeat Scarlet’s Marionette 10 times.
Like Clockwork – 3AP
Avoid all of the Twisted Marionette’s special attacks during an assault on its power regulators, you can find the unique attacks and which Warden they take place during above or in this list below.
- Marionette Lightfoot – Warden 1 or 0 Chains Severed
- Marionette Sidestepper – Warden 2 or 1 Chain Severed
- Marionette Short-Circuiter – Warden 3 or 2 Chains Severed
- Marionette Dodger – Warden 4 or 3 Chains Severed
- Marionette Muter – Warden 5 or 4 Chains Severed


Heya 🙂
“Like Clockwork – 3AP
Avoid all of the Twisted Marionette’s special attacks during an assault on its power regulators, you can find the unique attacks and which Warden they take place during above or in this list below.”
… Does than mean we have to dodge, or just not be hit ? Do we have to dodge (or not take) only 1 time, or for the whole fight with Boss ?
Ty in advance <3
You don’t have to dodge them actively, just avoid being hit, you can try to stay near the regulator most of the time is the safer spot, the whole fight on the platform, and you will only get credit if all the platforms succeed.
Do u need avoid being hit all times or just once?
You need to avoid for the whole fight. Blocking also seems to not be avoiding, so Aegis or sth else apparently make a fail 🙁
Tx a lot 🙂 Dodge seems to work also. The platforms you belong to (lane 1, 2, 2, 4 or 5) all need to succeed, not all the lanes, cause you get credit after the lane has finished it :p
For “Like Clockwork”, the other platforms can fail. It’s for the single achievement (dodger, muter) that all the platforms must succeed. I got the Clockwork for example, but I still miss the Muter, because when I did it, some other platform failed. But it counted for Clockwork.
Lovely Guide Thanks <3
Do yo only get credit for Marionette Deregulator when the event succeeds, or if you just kill the warden on your platform, or do all the platforms have to kill their wardens?
All platforms need to succeed
So to answer my own post (which I cannot edit or delete :p). It seems you get credit for killing the warden if all your platforms succeed.
Thank you so much for this guide! it helped immensely in my pursuit of completion! I now hit 37.5k AP! Keep up the great work!! – Plague –
Ty! I’m glad it helps 🙂