
GW2. A complete achievement guide of the Living World Season 3 Episode 6 “One Path Ends”.
One Path Ends (Story Journal)

Total achievements: 44 – 123AP
“One Path Ends” Mastery – 25AP – 1MP
This is the meta achievement for which you need to complete 36 eligible achievements. The reward for this is a Mursaat Brogan Box.


Story Completion Achievements – 0AP – 3MP
“Where’s Balthazar?” – 0AP – 1MP
Journal: “Where’s Balthazar?” Completed
Complete the story chapter “Where’s Balthazar?”
Shining Blade Secrets – 0AP – 1MP
Journal: Shining Blade Secrets Completed
Complete the story chapter “Shining Blade Secrets”
On Orrian Shores – 0AP
Journal: On Orrian Shores Completed
Complete the story chapter “On Orrian Shores”
The Flow of Magic – 0AP
Journal: The Flow of Magic Completed
Complete the story chapter “The Flow of Magic”
The Last Chance – 0AP – 1MP
Journal: The Last Chance Completed
Complete the story chapter “The Last Chance”
Story Instance Achievements – 33AP
King Crab – 2AP
Story Instance: “Where’s Balthazar?” – White Mantle Hideout
To earn this achievement you need to kill the King Crab. He can spawn randomly in one of two locations:
- North side of the lake, underwater
- Eastern side of the cavern, behind the waterfall (can be reached by gliding)


With Friends Like These… – 1AP (Hidden)
Story Instance: “Where is Balthazar?” – White Mantle Hideout
To earn this achievement you must solve the puzzle to free the Shining Blade Exemplar, but you must do so by overloading the puzzle rather than turning it off. Essentially this means turning on all the bloodstone triggers. You must take bloodstone shards from the nearby barrel and throw them at one of the 8 points. This will toggle the point that you throw it at and the two adjacent points from on to off or off to on respectively.
To get this achievement you will want to turn all of them on, so follow the steps below to get it done in the least amount of step (assuming you have not changed the pattern from the default state).
Step 1 – The puzzle should look like this at the start if you are facing north. Grab a bloodstone shard from the barrel to the side. Start by throwing a shard at the northwestern point.

Step 2 – Next throw a bloodstone shard at the southwestern point.

Step 3 – Then throw a shard at the southern point.

Step 4 – Lastly throw a shard at the southeastern point.

Not on My Watch – 2AP
Story Instance: “Where’s Balthazar?” – White Mantle Hideout
For this achievement you need to prevent reinforcements, right when you reach the room with the second Bloodstone Shard, kill the White Mantle Initiate before he runs off to the west trying to alert the others.


Cleaning Up the Mess – 3AP
Story Instance: “Where’s Balthazar?” – White Mantle Hideout
After getting the achievement above and prevented the reinforcements, after taking care of the Bloodstone Shard, go to the west room and kill all the reinforcements.


Block the Shock – 3AP
Story Instance: “Where’s Balthazar?” – White Mantle Hideout
During the fight against Justiciar Araya, you need to kill her without letting her summon any unstable elemental. To achieve this, you need to break her defiance bar (CC) at 75%, 50% and 25% health. If your build has low CC capabilities it’s recommended that you throw Unstable Bloodstone Fragments at her to instantly break the bar.


Into the Mind of Madness – 3AP
Story Instance: “Where’s Balthazar?” – White Mantle Hideout
For this achievement you need to find and collect 6 documents. Better if you do this at the end of the instance when all enemies are dead, check the map below and a video guide if you need more help:
- Water-Damaged Letter – A small letter underwater in the northeast corner of the lake, on the seabed, on the side of a large rock.
- Initiate’s Journal – Take the bouncing mushrooms at the start until you get as high as you can, then glide to the ledge filled with spiders in the southwestern corner of the map. Climb through spider webs and up ledges until you find a dead White Mantle member.
- Torn Letter – Located in the first room you come to after the initial tutorial bloodstone glyph. The letter is found on the body of a fallen member of the White Mantle
- Inventory Sheet – This item is placed on top of a crate in the northeast corner within the central room where you free the Shining Blade Exemplar.
- Burned Letter – Located in a western side room, in a fire between two tents on the south side.
- Araya’s Journal – Located on the southwest side of the central podium in the final room, after fighting Justiciar Araya.


Credit to AyinMaiden for the video.Graffiti Artist – 1AP
Story Instance: “Where’s Balthazar?” – White Mantle Hideout
Inside the instance you can find some statues that you can destroy, this achievement only requires you to destroy at least one. Check the next achievement for more.
Art Critic – 3AP
Story Instance: “Where is Balthazar?” – White Mantle Hideout
As mentioned above in “Graffiti Artist” you need to destroy statues of the White Mantle, but this achievement requires you to destroy all 17 statues on the instance. It’s easier that you attempt to do this at the end of the instance when all enemies are dead and you can focus on which ones you need. Check the map below for their locations.


Hold the Line – 2AP
Story Instance: Shining Blade Secrets
For this achievement you need to survive the first encounter for at least 5 minutes. Try to not attack enemies and kite them until the time is up because the more you kill the stronger they become. Anise will kill them by herself so you can pull the groups to her and hide. Stealth will make this achievement super easy.

Precision Blade – 1AP
Story Instance: Shining Blade Secrets
During the first encounter, you need to kill a total of 50 White Mantle Invaders. It’s recommended you bring high DPS and AoE to kill many enemies as you can before the first two minutes, after this point the enemies will do more damage. As alternative you can hide on stealth and let the NPC kill them, and revive them so they can do the job for you. This achievement can be done in party as well to make it easier.

Fearful – 2AP
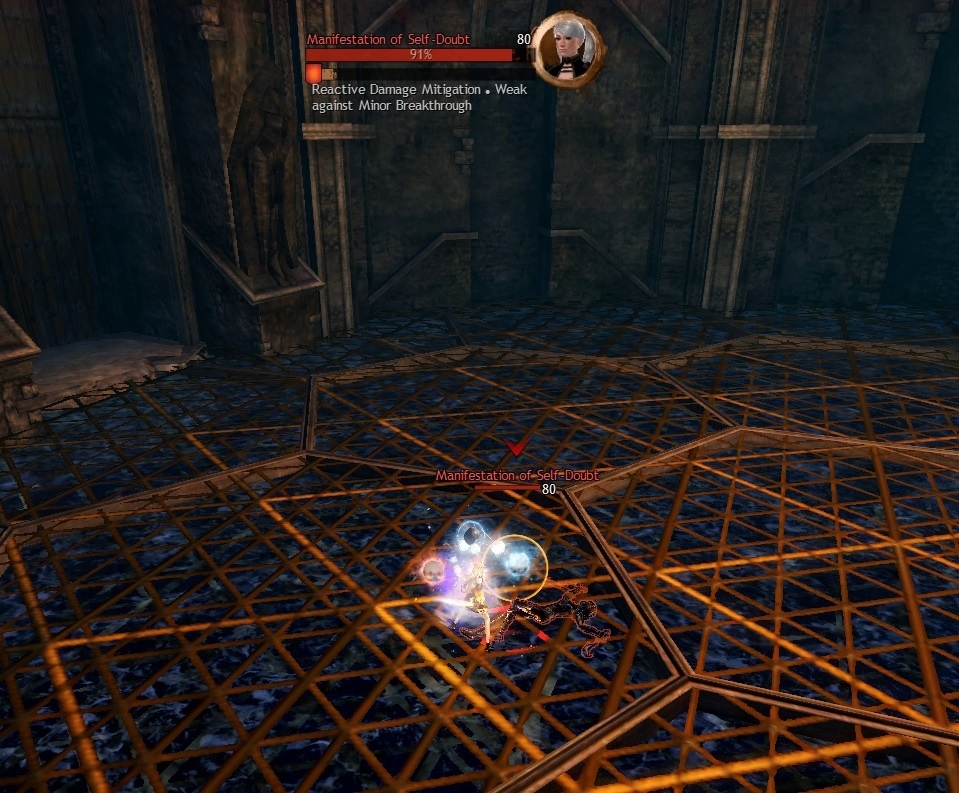
Story Instance: Shining Blade Secrets
During the fight against the Manifestation of Self-Doubt, you need to defeat the boss USING the Minor Breakthrough special skill. Speak with any of the ghosts around and use the special skill to break the defiance bar on the boss and burst damage until it dies.


NOTE: This achievement is mutually exclusive with “Fearless” you will need to run the instance at least twice.
Fearless – 2AP
Story Instance: Shining Blade Secrets
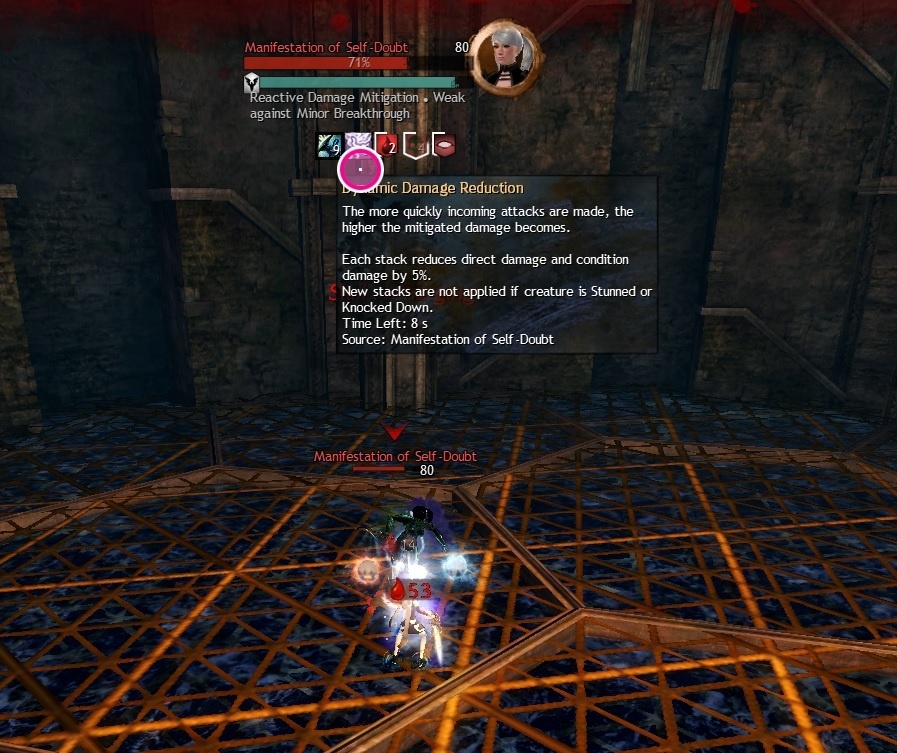
During the fight against the Manifestation of Self-Doubt, you need to defeat the boss WITHOUT USING the Minor Breakthrough special skill. You will need to manually break the boss defiance bar. This achievement can be hard and is strictly soloable.
Each time you hit the boss it gains a Dynamic Damage Reduction debuff which can reach 100% making it immune to damage, plus the ghosts around shooting hands at you will give you a permanent debuff increasing the cooldown on weapon swap and lowers movement speed (Crushing Guilt), while giving even more damage reduction to the boss (Guilt Exploitation) stacking up to 25. However once you get hit by the 26th hand, you gain Mighty Alacrity which will clear the Guilt Exploitation on the boss allowing you to do more damage, but it won’t clear your stacks. The hands are undodgeable, so you want to avoid reaching the max stacks or your skills will have insane cooldowns.
The best strategy is to take utilities and weapon that can CC the boss defiance bar using the least amount of hits possible to minimize the damage reduction buff gained, and burst the boss down once the bar is broken. When the bar refills stop attacking and focus on breaking the bar again without stacking their buff and repeat.
Condition builds and passive healing are the best for this, since it is damage over time and you will keep doing damage without using many cooldowns.


NOTE: This achievement is mutually exclusive with “Fearful” you will need to run the instance at least twice.
Two Sides, Same Coin – 1AP
Story Instance: Shining Blade Secrets
You will get this achievement automatically as soon as you complete both “Fearless” and “Fearful” achievements.
Student of Bartholos – 5AP
Story Instance: Shining Blade Secrets
After you complete the instance, don’t leave and head to the house at the center of the Shining Blade Base, inside you have to collect 10 pages. They aren’t hard to find but if you need help check out this video:
Credit to sixburn gaming for the video.Lightfoot – 1AP
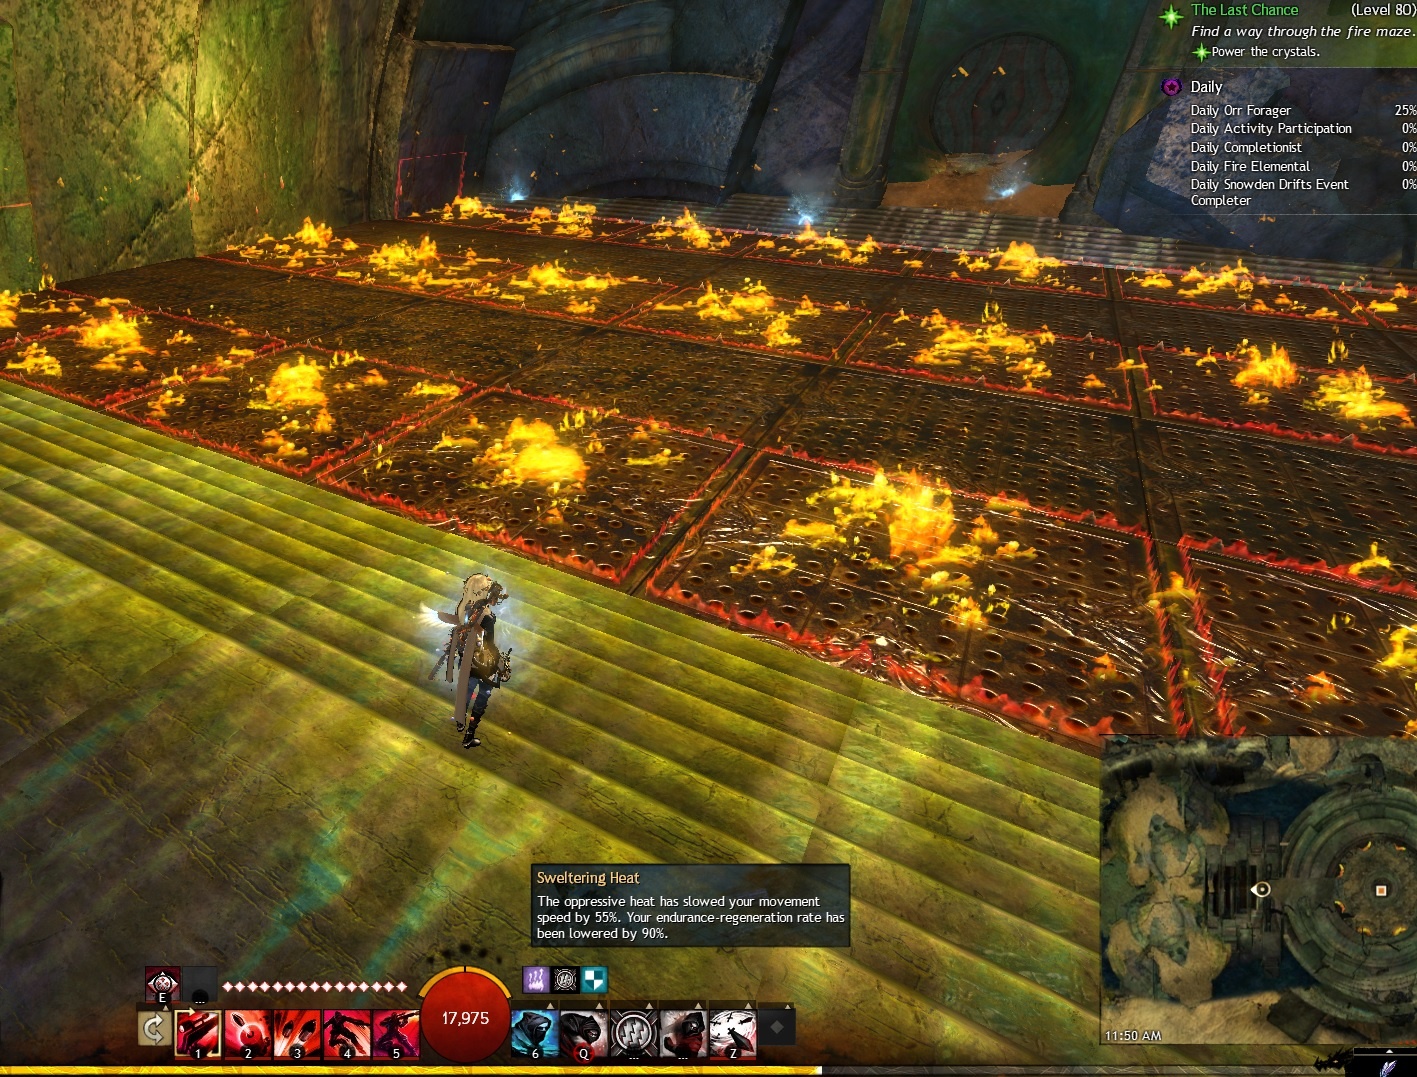
Story Instance: The Last Chance
In the second room you have to avoid being hit by the fire traps. You will see a grid with the traps and on each side orbs that you have to place in the pedestals. Simply cross, grab the orb and place it without being hit. While you are on the platform you get a movement speed debuff, so the easier way to do this is using teleport and leap/dash skills, even portal.


A Quick Death – 1AP
Story Instance: The Last Chance
To earn this achievement you need to complete the final fight under 9 minutes. This fight has four phases:
- Phase 1
Once you place the Aspects in their pedestals, Lazarus spawns and 5 Aspects arounds him, they are invulnerable. Lure the Eye of Janthir into the path of the Aspects of Lazarus, grab a rock from the ground, and throw it at the Eye while the Aspects are near, this will make them vulnerable and you can kill them, one at the time, repeat until you kill three of them.


- Phase 2
When two Aspects are left, Livia will cast a spell to make the rest of the Aspects vulnerable, protect her while it is removing the shield. Sparks will spawn trying to kill her, revive if she goes down. Once the shields are gone, kill the first Aspect and repeat for the other. Some lightning attacks could randomly appear, try to avoid them for the next achievement.


- Phase 3
After the two Aspects are dead, attack Lazarus from 35% to 5%. Pay attention to the lightning attacks and try to break his bar to interrupt. AVOID all lightning attacks for the next achievement.


- Phase 4
When he reaches 5% Health, he is immune and keeps using lightning attacks, keep avoiding them and pick up the Shining Blade on the ground, use it to finish Lazarus.


Dodger Danger – 1AP
Story Instance: The Last Chance
As mentioned above, for this achievement you need to avoid being hit by any lightning attack during the fight against Lazarus, these attacks have orange circles on the ground, check the achievement above to know more about the fight and when these attacks happen.

Map Achievements – 26AP – 7MP
Battle Orr – 1AP
Defeat the Champion Unchained Giant. The event is called “Defeat the undead giant before it can kill Willowdread” and occurs in Melandru’s Reliquary.


Echolocation – 2AP – 1MP
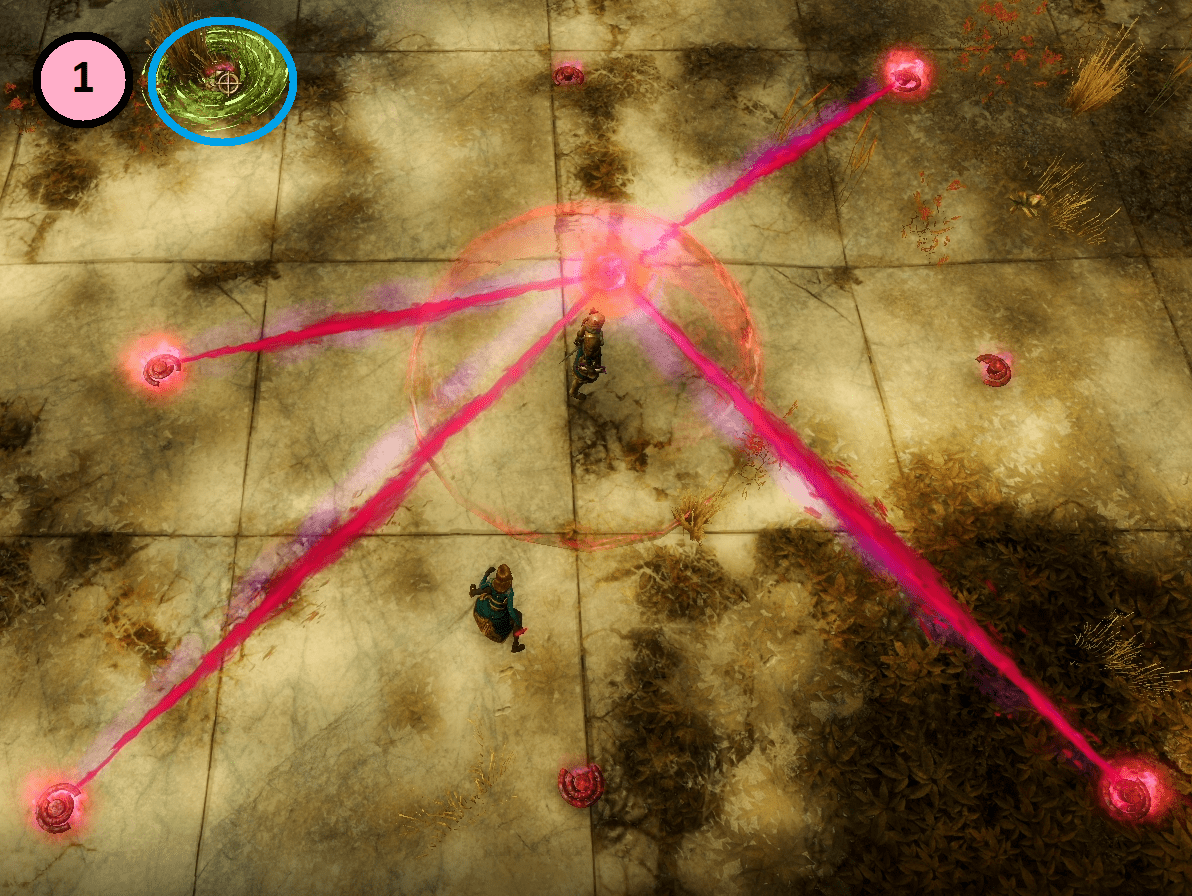
During the event “Defeat the unchained wyvern” in Dwayna’s Reliquary, fly through the Unchained Wyvern’s ring attack without being hit. This can be done by gliding far away from the wyvern as the ring gets wider the further it goes out and then controlling your glide through the direct center.


Feeling Beastly – 2AP
Defeat the Gargantuan Grub at Merciless Shore. There is a pre-event for this called “Escort Winfred to his prized prey” that starts at Camp Winfred – [&BOYJAAA=] . The Grub will spawn after you defeat the Gorilla.


Roll for Greed – 3AP (Time-Gated)
For this achievement, you need to open a total of 10 chests at Hidden Reliquary – [&BOMJAAA=] . In order to have access you need to complete all five heart quests on the map, once inside you can only open 1 chest daily (you can pay 1,5 gold to open a second chest). This limit is character based, you can use another to complete the achievement faster if you need.


Dive Master: Masted – 3AP
You will earn this achievement once you reach the Diving Goggles and jump into the water but since they are at the end of the jumping puzzle, check the next achievement to earn both at same time.
Abaddon’s Ascent – 10AP – 1MP
This is the Jumping Puzzle of Siren’s Landing, you need to get two checkpoints and once you hit one, you will gain the ability to return to the last checkpoint. You don’t need the checkpoints to loot the final chest but you need them to obtain the achievement. Once you reach the top you can access the Diving Goggles for that achievement as well. Check out this video to know how to do it:
Credit to SuperMoroLand for the video.Mastery Insights – 5AP – 5MP
Siren’s Landing Insight: Buoyant Bough – 1AP – 1MP
Interact with the Mastery Insight to earn the achievement. To reach it you must board the Bouyant Bough, a ship off the coast of Siren’s Landing. You can either use mounts, glide to it from the jumping puzzle or you can capture the energy from a ley-line scavenger and swim out to the boat while holding it and then launch up using the 2 skill to get on the side of the boat and leap across the pillars to get on the deck. From the deck you can use the bouncing mushroom to reach the mastery,


Siren’s Landing Insight: Cliff’s Edge – 1AP – 1MP
Interact with the Mastery Insight to earn the achievement. Take the updrafts at Dwayna’s Reliquary to the top of the southeastern cliffs. Some of the updrafts disappear so you may need to stop off at some of the higher ledges until the updrafts reappear. The mastery insight is at the back of the falls so you will need to go around the currents.


Siren’s Landing Insight: Dwayna’s Tears – 1AP – 1MP
Interact with the Mastery Insight to earn the achievement. Use the updrafts at the Dwayna’s Reliquary to reach the mastery insight on the western cliffs.


Siren’s Landing Insight: Kelp Rock – 1AP – 1MP
Interact with the Mastery Insight to earn the achievement. Climb the slope at the bottom of Melandru’s Reliquary to reach the top of Kelp Rock where the mastery insight is.


Siren’s Landing Insight: Lava Leap – 1AP – 1MP
Interact with the Mastery Insight to earn the achievement. Climb the rock at the western end of Balthazar’s Reliquary. You can use the 2 skill from the energy gained by killing the ley-line scavenger to leap into the air to reach the mastery insight.


Collections – 38AP – 2MP
Risen Research – 7AP
This collection requires you to find 7 Journal Pages around Siren’s Landing. This achievement will allow you to continue with the following two: “Pruning the Weed” and “The Withered Rose“.
- Page 1


- Page 2


- Page 3


- Page 4


- Page 5


- Page 6


- Page 7


Pruning the Weed – 3AP
Once you completed the collection above “Risen Research”, head to Overgrown Gazebo – [&BOcJAAA=] and you will have the option to Confront the Veteran Unchained Kingpin. Defeat it to earn this achievement, and continue with “The Withered Rose”.


The Withered Rose – 2AP – 1MP
Right after you kill the Veteran Unchained Kingpin, pick up a journal nearby (check the images below for the location) and deliver it to Dahlia at southwest of Camp Reclamation Waypoint – [&BO8JAAA=]
- Journal


- Dahlia


Master Storyteller – 5AP – 1MP
To earn this achievement, you need to complete the following 5 Storyteller collections below, and you will automatically get this one. Here you can see a general map with all the locations:

Storyteller: Balthazar – 3AP
For this collection you need to find and collect 6 pages of the Parable of Balthazar, you can see the locations in the map above or if you need more help check out this video:
Credit to Dulfy for the video.Storyteller: Dwayna – 3AP
For this collection you need to find and collect 6 pages of the Parable of Dwayna, you can see the locations in the map above or if you need more help check out this video:
Credit to Dulfy for the video.Storyteller: Grenth – 3AP
For this collection you need to find and collect 8 pages of the Parable of Grenth, you can see the locations in the map above or if you need more help check out this video:
Credit to Dulfy for the video.Storyteller: Lyssa – 3AP
For this collection you need to find and collect 8 pages of the Parable of Lyssa, you can see the locations in the map above or if you need more help check out this video:
Credit to Dulfy for the video.Storyteller: Melandru – 3AP
For this collection you need to find and collect 6 pages of the Parable of Melandru, you can see the locations in the map above or if you need more help check out this video:
Credit to Dulfy for the video.Storyteller: Abaddon – 6AP (Hidden)
For this collection you need to find and collect 12 pages of the Parable of Abaddon, you can see the locations in the map above or if you need more help check out this video:
Credit to Dulfy for the video.

