
GW2. A complete achievement guide of the Living World Season 4 Episode 3 “Long Live the Lich”
Long Live the Lich (Story Journal)

Total achievements: 71 – 124AP
“Long Live the Lich” Mastery – 28AP
This is the meta achievement for which you need to complete 38 eligible achievements. The reward for this is a Corsair Jerkin Box.


Story Completion Achievements – 0AP
Seized – 0AP
Journal: Seized
Complete the story chapter “Seized”
Forearmed Is Forewarned – 0AP
Journal: Forearmed Is Forewarned
Complete the story chapter “Forearmed Is Forewarned”
Shipwrecked – 0AP
Journal: Shipwrecked
Complete the story step “Shipwrecked”
Guns, Germs, and Steal – 0AP
Journal: Guns, Germs, and Steal
Complete the story step “Guns, Germs, and Steal”
High Roller – 0AP
Journal: High Roller
Complete the story step “High Roller”
A New Ally – 0AP
Journal: A New Ally
Complete the story step “A New Ally”
I’m Brave, You Know – 0AP
Journal: I’m Brave, You Know
Complete the story chapter “I’m Brave, You Know”
Be My Guest – 0AP
Journal: Be My Guest
Complete the story chapter “Be My Guest”
Story Instance Achievements – 16AP
Loquacious Orator – 1AP
Story Instance: Seized
For this achievement you need to hear all the arguments during the trial. This will take at least four runs, and you can relog after finishing the trial to try again.
- First dialogue:
 (Ferocity) Defend your friend’s honor (Councilor Mayameen, I take exception to that characterization. This “creature” is an associate of mine.)
 (Dignity) Ask to speak (Councilor Mayameen, if it pleases the court, I’d like to speak.)
- Second dialogue, leading to a further two dialogue:
- (Ferocity) Explain the circumstances (Your Honor, Gorrik is working to PREVENT an outbreak.)
- (Ferocity) Tell the truth (It’s the Scarab Plague. We believe Joko is planning to unleash it.)
- (Dignity) Ask for the councilor’s trust (I can’t say more, Your Honor. You’re going to have to trust me.)
- (Dignity) Find an error in the court’s process (Your honor, did you have Gorrik examined?)
- (Dignity) Ask for proof (So you admit you have no medical proof that he’s infected or contagious.)
- (Ferocity) Call out racial bias (“Look at him”? What’s that supposed to mean?)


Squish, Squish – 1AP
Story Instance: Seized
NOTE: This achievement will be available once you finish the story first, after completing the chapter “Be My Guest” with the same character.
You need to kill all the Scarabs under 30 seconds. This happens right after Faren meet the guests from the ship. You can do this very easily with a mount like Raptor, simply run over them.


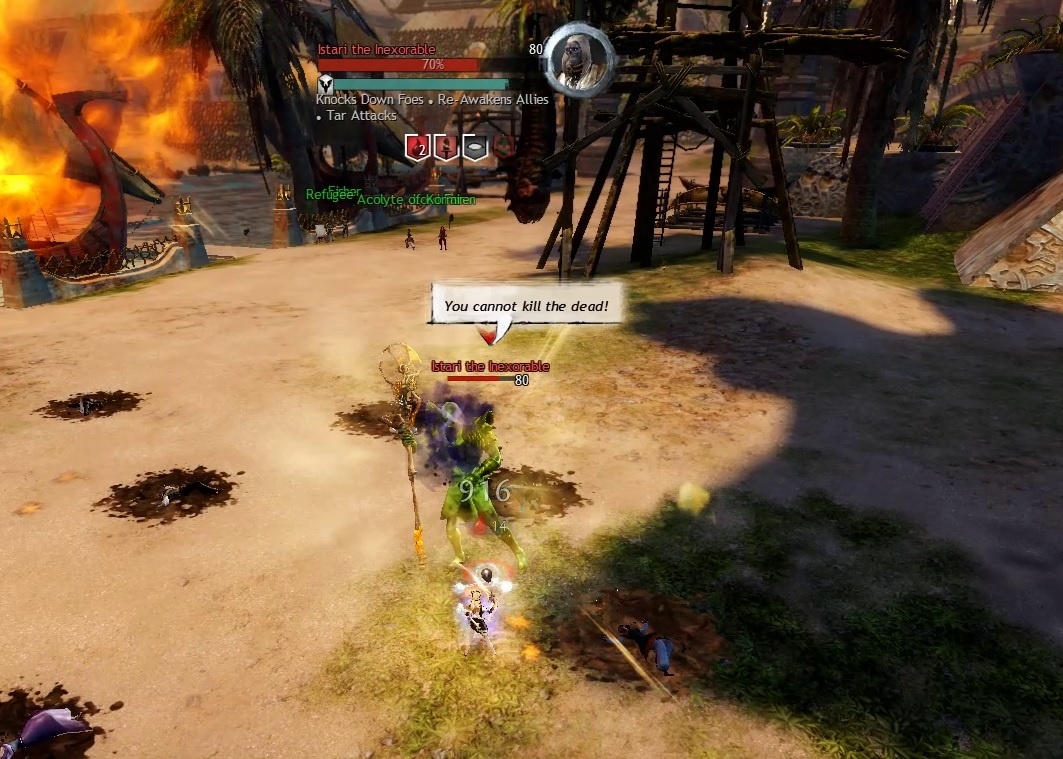
Stay Asleep, Sheep – 3AP
Story Instance: Seized
NOTE: This achievement will be available once you finish the story first, after completing the chapter “Be My Guest” with the same character.
Keep Istari the Inexorable from Awakening your allies. The boss gains a defiance bar often and you need to break it (CC bar) to prevent it and earn the achievement.


Decimation – 1AP
Story Instance: Forearmed Is Forewarned
Kill 6 Awakened with a single bomb blast. This achievement is almost free as Canach actually does it for you when he throw bombs around. Alternatively you can place a bomb on the barricades and luckily you will hit 6 enemies at once.

Glory Hog – 1AP
Story Instance: Forearmed Is Forewarned
Plant seeds at all the locations before Canach has a chance to help. First you need to plant seeds at the two locations where Canach was supposed to do it. Start with his two spots at east because he has superspeed, you can follow him and teleport ahead when you notice the mounds or check the map below with the locations and go directly. Canach will return to camp after his route is complete and you will have plenty of time for the other two.


Silent but Deadly – 3AP
Story Instance: Forearmed Is Forewarned
For this achievement never raise suspicion to the point that champions are deployed against you. It’s pretty easy to do as long you don’t get close to the champions. If you get detected by anything use your skill #1 and then skill #2 if necessary to kill.


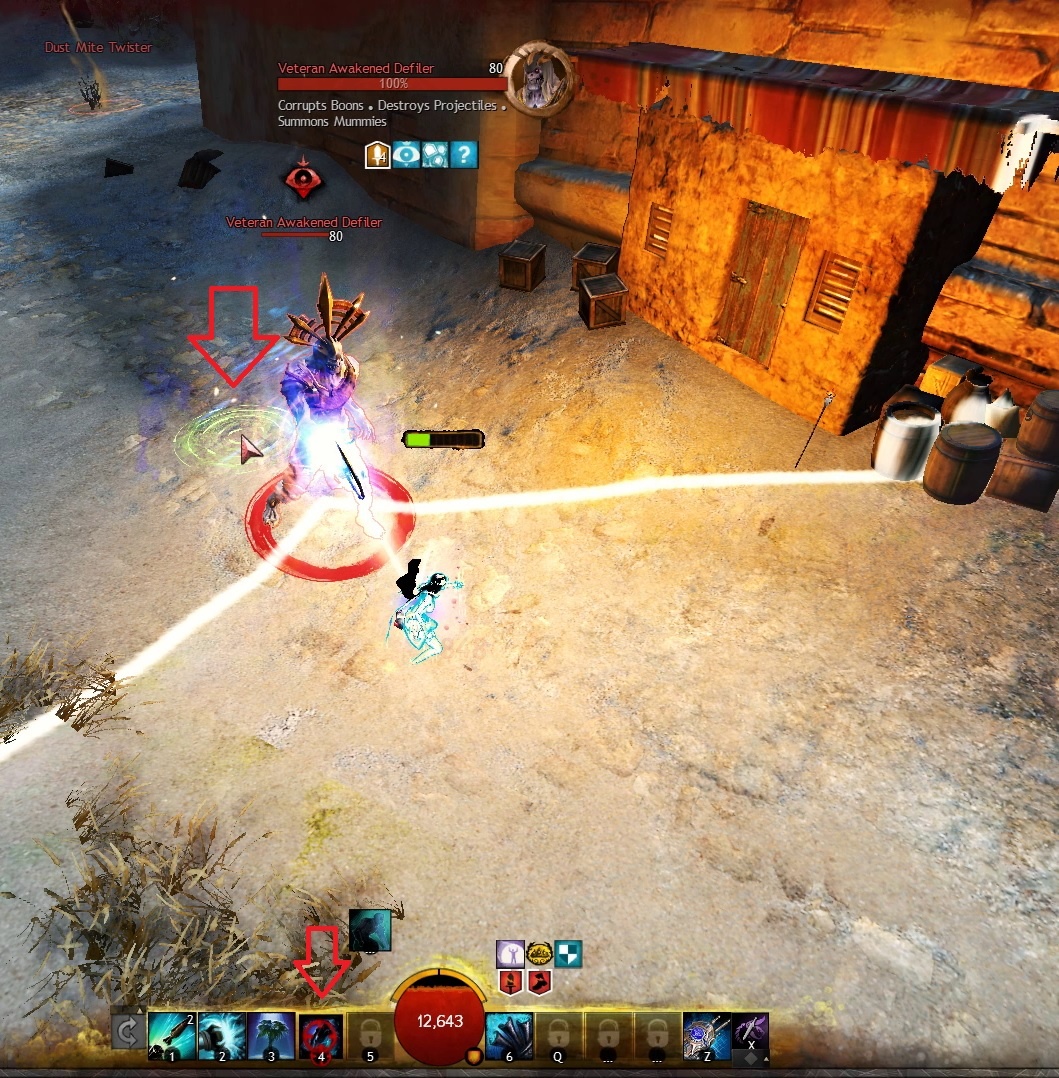
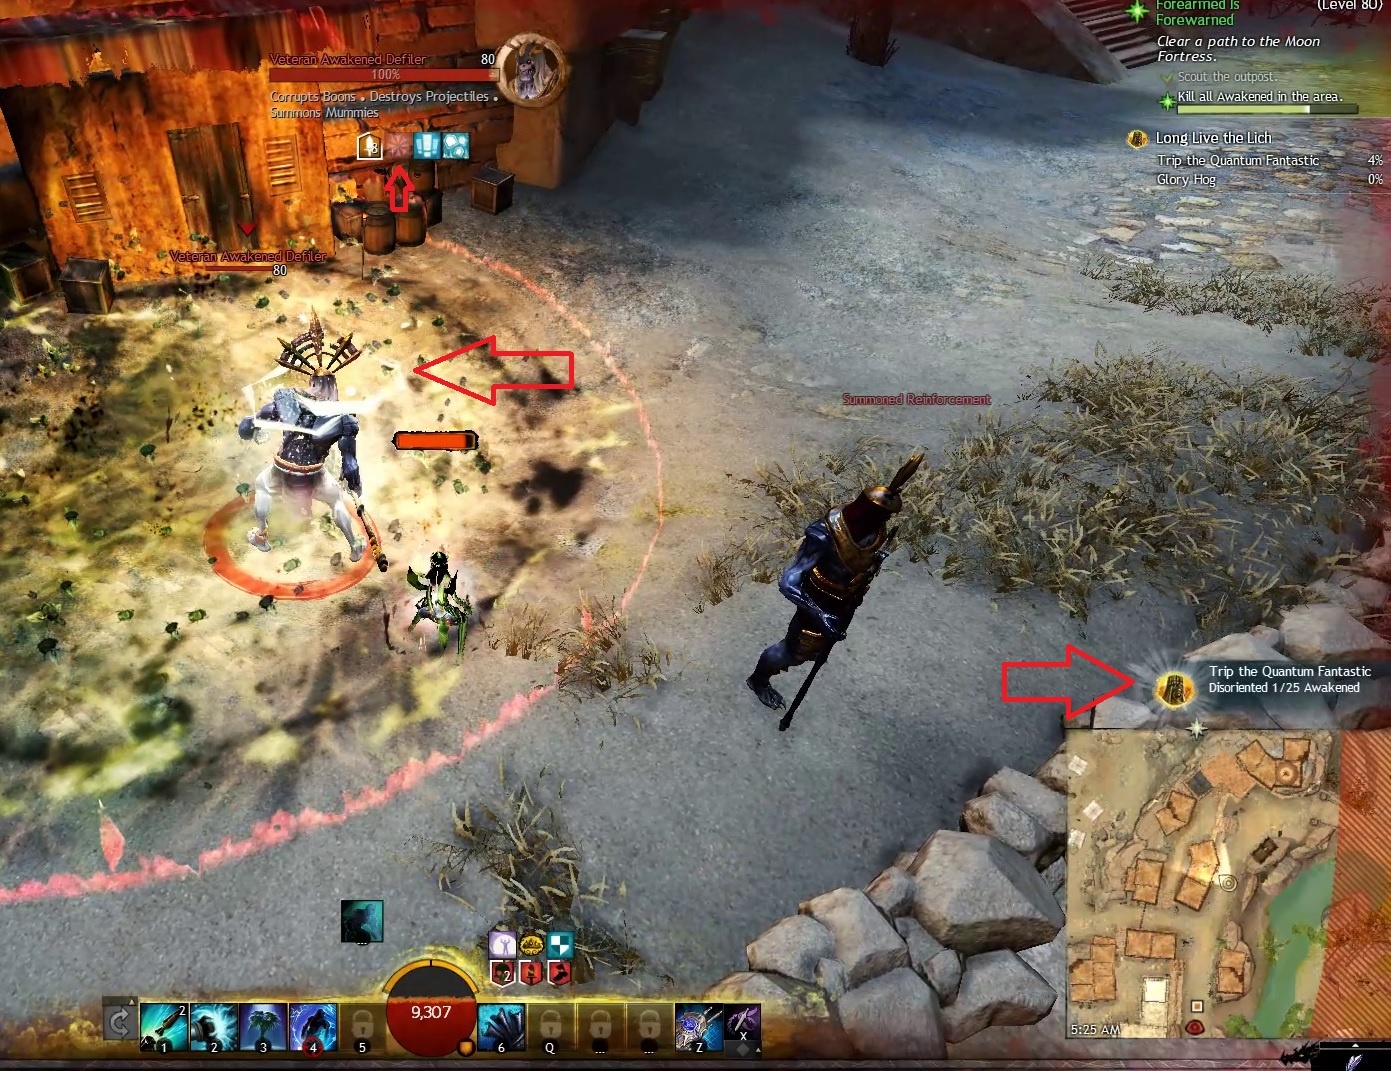
Trip the Quantum Fantastic – 1AP
Story Instance: Forearmed Is Forewarned
Disorient 25 Awakened with the Quantum Mass Displacement Matrix. Basically what you need do is be spotted by an enemy and quickly use your skill #4 to teleport behind, you can repeat this very quickly on the same enemy at rapid succession and it will increase your progress instead of going for 25 different ones. You will see that the enemies will get stunned.

Whistling in the Dark – 1AP
Story Instance: Be My Guest
Successfully defend Canach while he arms the bomb in under six minutes. The timer starts when Canach goes to the door to arm the bomb, there is plenty of time to defeat all the waves of Awakened enemies before they reach Canach.


Captive Audience – 1AP
Story Instance: Be My Guest
For this achievement you need to get hit by EVERY trap, each time you get hit Joko says a taunt. Use your special skill all the time to reveal all the laser traps and make you sure you don’t miss any. There are a total of thirteen taunts for getting hit by lasers, fire and ice traps. You will see Joko standing there and he will speak when you get hit by a trap.


NOTE: This achievement is mutually exclusive with “Dexterous and Flexible”, you will need to run the instance at least twice.
Dexterous and Flexible – 3AP
Story Instance: Be My Guest
This achievement is the opposite as above, you need to avoid getting hit by all the LASER traps (if you get hit by the fire and ice traps on the floor you can still get the achievement). The best way to do this is with Thief or Mesmer and use teleports to skip the traps, use your special skill often to reveal the traps and be aware of the lasers in the room where you fight the Beastmarshal at the end. You can safely defeat the boss using range without risking to jump over the lasers. You can safely die and try again as long you don’t hit the lasers. Check the video below to see how to do it with Thief which is my recommendation for this:
NOTE: This achievement is mutually exclusive with “Captive Audience“, you will need to run the instance at least twice.
Map Achievements – 56AP – 6MP
Rude Awakening – 3AP
Talk with Lady Camilla at slightly north of the Allied Encampment Waypoint – [&BFcLAAA=] to unlock this achievement and two other as well (The Tyrian Service Medal and The Gandaran Service Medal) go kill Awakened enemies in the map until you collect 25 Awakened Blood dropped by them to earn the achievement (you will need the Vial of Awakened Blood given as reward for the backpack collections later on).


Pond Scum – 1AP
Slay the Legendary Crazed Broodmother at Ntouka Pond. This event spawns when a player brings a Mysterious Egg up from the depths of Ntouka Pond to the surface.


Still Waters Run Deep – 2AP
You will earn this achievement automatically by reaching the Mastery Insight, for more information on how to get there check below the “Domain of Kourna Insight: Ntouka Pond” achievement.
Dances with Cacti – 1AP
At Idol of the Choya – [&BF4LAAA=] each 10 minutes the event called “Dance with the choya to assist Tebb’s research” spawns and for the achievement you need to use the emote /dance on the top of the center rock while not transformed.


Debbie’s Cakes – 2AP
For this achievement you need to acquire 10 Debbie’s Cakes. You can buy them by completing the heart quest daily but only if you do it correctly. The idea is to use the torch to burn ONLY the diseased crops, not regular crops. You can use multiple characters to acquire all the cakes at once, or get them daily.
- If no healthy crops were burned, you may buy 3 cakes from her.
- If 1–2 healthy crops were burned, you may buy 1 cake from her.
- If 3 or more healthy crops were burned, you may not buy any cakes from her.


I Can See My House… – 1AP
Very simple, go to the mountain with the Griffon Master adventure and then use your Roller Beetle mount to earn the achievement.


Taking All Their Secrets – 3AP
This achievement is related to the Containing the Scarab Plague meta-event that occurs at Imperial Center for Applied Pestilence – [&BGcLAAA=] . You basically need to do it 10 times and loot the chests each time. Keep in mind you need the Access Card from killing the champion Inquest, otherwise you can enter to the chest area if someone else port you. Check the images below to see where to use the Access Card (you need to double click the card in your inventory for the effect).


Thing That Wouldn’t Leave – 1AP
Overstay your welcome in the Awakened Inquest plague research lab. There are two ways to earn this achievement:
- Complete the event called “Help Researcher Emm track the origin point of the mutated rats” and stay inside the Research Vault Beta – [&BFoLAAA=] until you get teleported out.
- Head to northwest of the Research Vault Beta – [&BFoLAAA=] where there is a hidden Inquest lab behind a cliff wall. There is a button disguised as a rock outcropping on the wall which will open the entrance, and the event called “Clear out the Awakened Inquest lab” will trigger, then stay inside until you get teleported out.


Crab Kickin’ – 1AP (Hidden)
At the southern shore by Corsair Landing you can find Surly Crabs, go near one and use the prompt “Kick” they will become Angry Crabs and will cause to attack nearby Awakened enemies, once they do it you will earn the achievement.


Mastery Insights – 5AP – 5MP
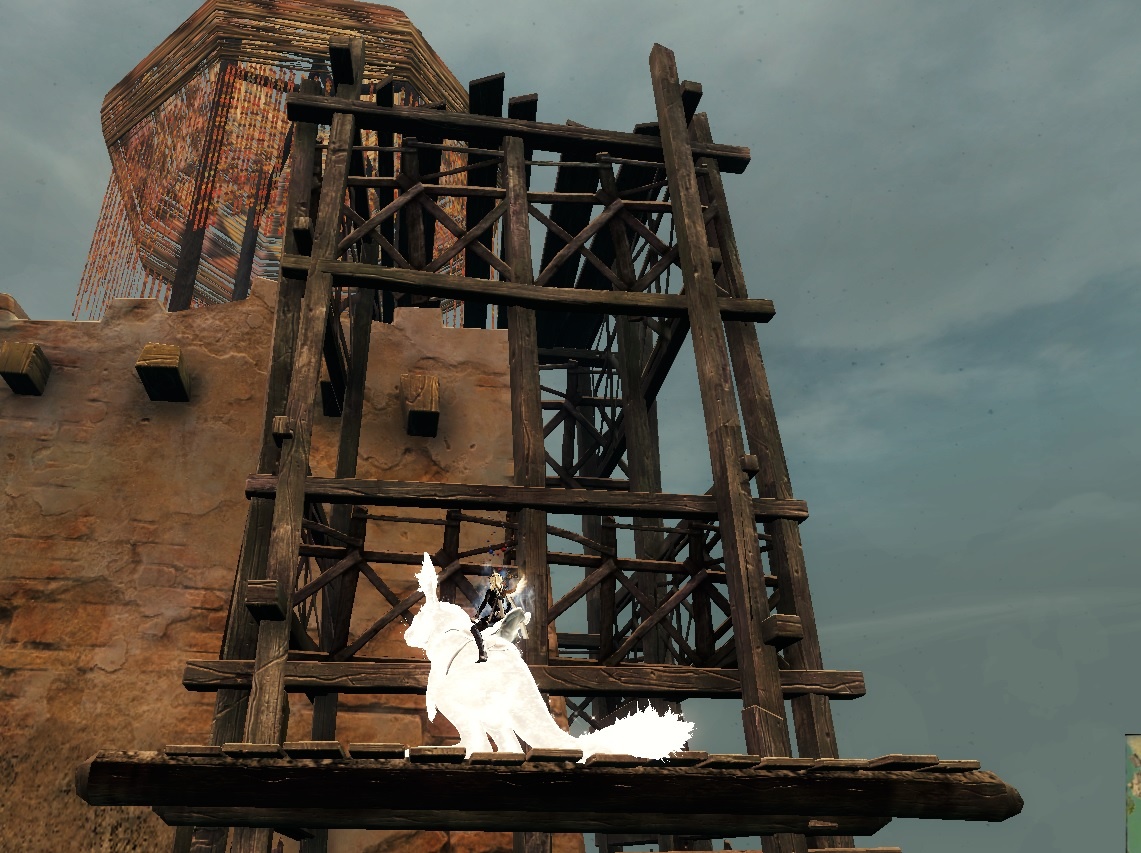
Domain of Kourna Insight: Allied Encampment – 1AP – 1MP
Interact with the Mastery Insight to earn the achievement. Starting from the Allied Encampment Waypoint – [&BFcLAAA=] head southwest and use a Springer to climb the external scaffolding on the building. The insight is on top of the tower, under the canopy.

Domain of Kourna Insight: Bokoss Prison Ruins – 1AP – 1MP
Interact with the Mastery Insight to earn the achievement. Starting from the Allied Encampment Waypoint -[&BFcLAAA=] take the portal to Bokoss Prison Ruins – [&BFYLAAA=] and use the Roller Beetle’s Barrier Smash mastery to break through the wall. The insight is located behind the wall.


Domain of Kourna Insight: Dabiji Hollows – 1AP – 1MP
Interact with the Mastery Insight to earn the achievement. Head east from the Allied Encampment Waypoint – [&BFcLAAA=] over the bridge. Soon you will face another bridge. Go under the bridge into the cave. Can be tricky to climb with Springer but as alternative you can use Griffon as well. Check the images below for reference:


Domain of Kourna Insight: Dunlon Springs – 1AP – 1MP
Interact with the Mastery Insight to earn the achievement. You have three ways to getting there:
- Swim from the south through an underwater passage.
- Use your roller beetle mount to break through the wall to the west of the insight.
- Use your springer mount to jump into the pond from the desert bandit camp outside.


Domain of Kourna Insight: Ntouka Pond – 1AP – 1MP
Interact with the Mastery Insight to earn the achievement. To access the Ntouka Pond area you can do it in three ways:
- With a Roller Beetle Mount using the destructible wall to the south
- With a Jackal Mount using the sand portal on a rooftop in Arkjok Farmlands
- With a Springer or Griffon or Skyscale Mount to climb the hillside
Once there enter the pond and swim down past the wurms at the bottom. You will also earn the “Still Waters Run Deep” achievement.


Adventures – 6AP
Domain of Kourna Griffon Expert: Gold – 1AP
This is a Griffon adventure and you need to complete it under 35 seconds for the Gold medal. You will need all masteries for this. Check the video below to know how to do it:
Domain of Kourna Griffon Expert: Silver – 1AP
Same as above, but for silver you need to complete under 1 minute. Check the video above.
Domain of Kourna Griffon Master: Gold – 1AP
This is a Griffon adventure and you need to complete it under 55 seconds for the Gold medal. You will need all masteries for this. Check the video below to know how to do it:
Domain of Kourna Griffon Master: Silver – 1AP
Same as above, but for silver you need to complete under 1:20 minutes. Check the video above.
Roller Beetle Training: Gold – 1AP
This is a Roller Beetle adventure and you need to complete it under 55 seconds for the Gold medal. Since this is a training adventure I don’t think a video is necessary because each checkpoint actually refill your boost.


Roller Beetle Training: Silver – 1AP
Same as above, but for silver you need to complete under 1:15 minutes.
FTT Achievements – 30AP – 1MP
[FTT 100] Intro to Field Tech Turret Dynamics – 1AP
For this achievement you need to talk with Krew Leader Drazz at Allied Encampment Waypoint – [&BFcLAAA=] and he will tell you about the turret next to him. This will allow you to interact with the turret which will complete the achievement and unlock the next ones in this series of achievements.


[FTT 101-107] Core Turret Dynamics – 3AP
You need to FARM Awakened Inquest enemies to collect schematics scraps from random drops that will unlock the ability to configure Field Tech Turrets to various types. Speak to Krewe Leader Drazz to get started. Each completed schematic Drazz assembles for you will unlock the ability to configure Field Tech Turrets to that type. Drazz will begin selling [FTT] Deployment Kits after assembling at least one schematic; he will give you the first one for free and you will need many of these for the next achievements.


[FTT 201–407] Practicum in Advanced Dynamics – 5AP – 1MP
Tinker with turrets by building and upgrading them to discover new upgrades. This achievement can take a lot of time because you need to obtain every upgrade related to Field Tech Turrets.
After getting all the schematics from the previous achievement speak to Krewe Leader Drazz to claim your free [FTT] Deployment Kit and buy extra if you need with a cost of 1 Inscribed Shards + 5 Spare Parts + 50 Volatile Magic.
Unlocking the max upgrade level for each type costs a minimum of 875 Spare Parts (You mostly obtain these by killing Awakened Inquest or completing events in Domain of Kourna)
- Level 2 turrets: You can reconfigure a single turret as often as you like. Each reconfiguration counts as building and does not have any cost.
- Level 3 turrets: You can reconfigure a turret, then upgrade it once for 5 Spare Parts. You will need to do this eight times for each of the seven turret types for a total of 280 Spare Parts.
- Level 4 turrets: you need to upgrade a turret twice after reconfiguration for 5 + 10 Spare Parts. You will need to do this six times for each of the seven turret types for a total of 630 Spare Parts.
- You cannot upgrade a turret to level 3 without first upgrading it to level 2. However, if you just unlocked a level 3 turret by upgrading a turret to level 2, you can save 5 Spare Parts per turret type by upgrading it to level 3 immediately.
- WARNING! Be careful when interacting with the turret since they won’t change instantly after upgrading, leading to wasting spare parts if you try to upgrade or reconfigure it again too quickly.
These are all the sub achievements for each upgrade:
- [FTT 201] Intermediate Dynamics—Direct Damage Level 2 – 1AP
- [FTT 202] Intermediate Dynamics—Area Damage Level 2 – 1AP
- [FTT 203] Intermediate Dynamics—Healing Aura Level 2 – 1AP
- [FTT 204] Intermediate Dynamics—Shield Bubble Level 2 – 1AP
- [FTT 205] Intermediate Dynamics—Boon Wave Level 2 – 1AP
- [FTT 206] Intermediate Dynamics—Speed Wall Level 2 – 1AP
- [FTT 207] Intermediate Dynamics—Gravimetric Tunneling Field Oscillator Level 2 – 1AP
- [FTT 301] Proficient Dynamics—Direct Damage Level 3 – 1AP
- [FTT 302] Proficient Dynamics—Area Damage Level 3 – 1AP
- [FTT 303] Proficient Dynamics—Healing Aura Level 3 – 1AP
- [FTT 304] Proficient Dynamics—Shield Bubble Level 3 – 1AP
- [FTT 305] Proficient Dynamics—Boon Wave Level 3 – 1AP
- [FTT 306] Proficient Dynamics—Speed Wall Level 3 – 1AP
- [FTT 307] Proficient Dynamics—Gravimetric Tunneling Field Oscillator Level 3 – 1AP
- [FTT 401] Advanced Dynamics—Direct Damage Level 4 – 1AP
- [FTT 402] Advanced Dynamics—Area Damage Level 4 – 1AP
- [FTT 403] Intermediate Dynamics—Healing Aura Level 4 – 1AP
- [FTT 404] Advanced Dynamics—Shield Bubble Level 4 – 1AP
- [FTT 405] Advanced Dynamics—Boon Wave 4 – 1AP
- [FTT 406] Advanced Dynamics—Speed Wall Level 4 – 1AP
- [FTT 407] Advanced Dynamics—Gravimetric Tunneling Field Oscillator Level 4 – 1AP


Collections – 24AP – 1MP
Roller Beetle Mount
This episode features the Roller Beetle Mount and you can unlock it by doing these three collections:
- Beetle Juice – 3AP
- Beetle Saddle – 3AP
- Beetle Feed – 5AP – 1MP
For this purpose, I made a separated guide and you can check it here:
Banner of the Dauntless Commander
The Tyrian Service Medal – 1AP
Acquire all the available medals from the Tyrian campaign. For this achievement you need to do some World Bosses in Tyria and the Temple events in Orr (if the temple is already captured, the defense event will count too). Check the Timer here to know when they are available.
- World Bosses
- Shadow Behemoth (Queensdale) – [&BPcAAAA=]
- Fire Elemental (Metrica) – [&BEcAAAA=]
- Shatterer (Blazeridge) – [&BE4DAAA=]
- Great Jungle Wurm (Caledeon) – [&BEEFAAA=]
- Tequatl the Sunless (Sparkfly) – [&BNABAAA=]
- Golem Mark II (Maelstrom) – [&BNQCAAA=]
- Claw of Jormag (Frostgorge) – [&BHoCAAA=]
- Orr temple events
- Cathedral of Glorious Victory (Balthazar – Straits of Devastation) – [&BPoCAAA=]
- Cathedral of Eternal Radiance (Lyssa – Malchor’s Leap) – [&BK0CAAA=]
- Cathedral of Zephyrs (Dwayna – Malchor’s Leap) – [&BLACAAA=]
- Cathedral of Verdance (Melandru – Cursed Shore) – [&BBsDAAA=]
- Cathedral of Silence (Grenth – Cursed Shore) – [&BCIDAAA=]
The Gandaran Service Medal – 1AP
Acquire all the available medals from the Gandaran campaign. For this achievement you need to complete some events in Domain of Kourna, see below the details for each:
- Cannoneer’s Service Mark
Obtained after completing the event called “Disable the Awakened Inquest cannon before it can fire”. This is the defense event that spawn at the southwest of Bitterfly Bayou, due South of Apizmic Grounds Waypoint – [&BFALAAA=]


- Cannoneer’s Distinction
Obtained after completing the event called “Disable the Awakened Inquest cannon before it can fire”. This is the defense event that spawn at the northern part of the Eastern Front.


- Cannoneer’s Ribbon
Obtained after completing the event called “Disable the Awakened Inquest cannon before it can fire”. This is the defense event that spawn at the south of the Dabiji Hollows.


- Slayers Medallion
Defeat the Champion Awakened Abomination at the Front Line near the Gandara Main Approach – [&BGALAAA=]


- Golemneer’s Certification
Complete the event called “Repurpose the golem”, it occurs south of Allied Encampment Waypoint – [&BFcLAAA=] you will find the Researcher Maggin a bit past the thorn wall, complete the escort and fight the Plague Golem at the end to obtain the item.


- Defender’s Mark
Complete one of the events around the thorn wall without letting the awakened destroy the wall, it will start the event “Protect the thorn wall from the Awakened”


- Naturalist’s Crest
Complete one of the events around the thorn wall after letting the awakened destroy the wall, it will start the event “Defend the thorn wall shapers while they repair the wall”


- Caravaner’s Recognition
Complete the escort event “Safely escort the caravan from the ally camp to the farmlands” starting at Allied Encampment Waypoint – [&BFcLAAA=]


- Inventor’s Merit
Complete the event “Help Researcher Siris test his Rez-o-Matic device” that starts at Allied Encampment Waypoint – [&BFcLAAA=]


- Banner Ornament
You earn this item automatically by completing the story chapter Be My Guest.
Valor Beyond Valor – 1AP
This achievement is earned automatically by completing both Service Medal achievements above.
More Than a Hero – 5AP
For this achievement you need to craft the Banner of the Commander. You need Tailor or Leatherwork or Armorsmith crafting discipline level 500. Check the recipe below:


More than a Hero, a Symbol – 5AP
For this achievement you need to craft the Ascended Banner of the Dauntless Commander. You need Tailor or Leatherwork or Armorsmith crafting discipline level 500. Check the recipe below:


Amazing Guide. Thank you so much.