
GW2. A complete guide on How to Take the Best Screenshots and understand the graphics/camera settings of Guild Wars 2.

Fashion Wars
Fashion in Guild Wars 2 is considered a part of the Endgame, this game offers a wide variety of combinations to customize your characters look in many different ways. Collecting armor skins, weapon skins, dyes, infusions, legendary effects, outfits and more, can be an important goal for many players. But sometimes looking good is not enough, you want to look the best, so we are in the “Fashion War”.
The community often promotes fashion contests in order to share different styles and compete mostly for fun, but sometimes these community events feature prizes. Of course everything is subjective and there is no “meta” on how you should look, but it’s definitely a lot of fun to watch how other players put effort and inspiration into creating different and original styles, and helping others to participate in the “Fashion War” makes it all the better.
GW2 can look really amazing when you set up your game with good graphics and effects, of course you might experience hardware limitations if your system is not powerful enough and in zones or modes with a lot of players at the same time your performance can heavily drop. So that’s why taking screenshots is a very good and simple way to appreciate the beauty of the game and share with your friends or other players through social media or in community groups. Everybody can have cool ideas for fashion styles and interesting cosplays that you never thought of, but not always people know how to take the best screenshot to present that.
With this being said, you are invited to join GuildJen Discord and share your style with us, I also sometimes host fashion contests there and you can win interesting prizes 🙂
Now on this guide I will show you how to take the best screenshots and some tips and tricks to look awesome! Something like this:


Graphic Settings
As mentioned before, when you are playing you need performance besides the looks, so you need to reach a balance and this will depend on your hardware limitations. The optimal method will be always try to reach at least 60FPS to have a fluid gameplay, however if you drop to 30FPS or below when there are massive amount of players it will be still acceptable, this is your personal choice. But when we want to show off in a screenshot, we can just forget about performance for the moment and go ALL IN.
First I will explain in detail each one of the settings. Press F11 to open the options window and second tab for graphic options, the first four options are the following:
- Resolution: You can set the game as fullscreen with the resolution you want, of course it is always recommended to use the max resolution that your monitor supports, but still the best option here is to run Windowed Fullscreen. (sometimes this option might affect your performance in comparison with the other fullscreen options)
- Refresh Rate: The refresh rate is the number of times per second that a raster-based display device displays a new image. This is independent from frame rate, which describes how many images are stored or generated every second by the device driving the display. Lets not complicate ourselves with this and set it as Default.
- Frame Limiter: This option will allow us to limit the number of FPS, it can be beneficial in laptops if you want to decrease the heat and energy consumption but I recommend to set it as Unlimited.
- Interface Size: This option its simply to manage the size of the in-game UI, this is your personal choice I personally use Small to focus more on the gameplay, but normal provides more readable information, and large can help if you have trouble seeing the UI.
Next we have the Advanced Settings, you will notice the first option allows us to just select a Preset if you don’t want to mess with each setting, the options here are:
- Best Performance
- Autodetect
- Best Appearance
These presets will work fine in most cases depending on your needs, but we can still get more from the advanced settings if we manually set it. The autodetect preset is not really that accurate and the best appearance preset still won’t set everything at maximum to get the best look for our screenshots. Next I list each one of the advanced settings with my recommendation for a good balance between performance and look:


- Animation: It will impact mostly on water, clothing and some object animations, I personally use this on Medium for a good balance but if you are taking an action shot (a still image in the middle of some vivid movement) you will want this on high.
- Antialiasing: It will offer a few different methods to smooth the edges on objects and textures, this might have a big impact on performance, so if you are already running the game at 1080p you can safely disable this by selecting the None option, for a good fluid gameplay.
- Environment: This option controls the complexity of the terrain, props, decals and ground cover. It will have a big impact on performance so I take Medium for a good balance.
- LOD Distance: This setting is one the most important to improve your performance, it’s basically the Limit of Detail. It means the distance that you can see the objects and details, higher values will allow you to see them far away, which in most cases is not important, I recommend to set this on Low.
- Reflections: Another important setting to improve your performance, it’s basically reflections on some textures and water, having this on None is the best call especially because water can render underneath maps which you won’t even see.
- Textures: Controls the quality and resolution of all the textures in-game, having higher values will have a big impact on performance, a good balance on this is having it on Medium.
- Render Sampling: This setting will allow you to render the resolution of textures in a lower or higher scale, for a good balance always recommended to have it on Native. If you are going to be taking shots that you want to zoom in on, you can enable Supersample but it is not recommended to use this at any other time.
- Shadows: This setting has the largest impact on performance for the least result. Having shadows is not really that important unless you want to show depth in your screenshot. My recommendation is to select None.
- Shaders: This setting is very hard to measure, it basically adjusts how clear light and dark balance in the game. Wind and Lightning will be the most noticeable. This might have impact on the performance and I suggest you find a good balance for your own hardware, but this setting can make up for many other effects disabled which makes it very important to make your game look good, I personally run this on High.
- Postprocessing: This setting along with Shaders can make your game look very good without much cost on performance, it adds a very good amount of visual quality, details and lightning effects which can make up for areas that have poor lighting. You need to test which one you prefer between Low and High because in some snowy areas it can be painful to look at but otherwise I personally run with High.
- Character Model Limit: This setting is the same as LOD Distance but it controls the amount and distance of players displayed on your screen, this will have a HUGE impact on performance, especially for moments when you are surrounded by many players. I recommend to set this on Low.
- Character Model Quality: Almost the same as above, but this setting will limit the amount and proximity required of players displayed on your screen with high-res textures. Players displayed outside the limit of this will render as standard models without textures. I recommend to set this on Low but not on lowest because you won’t be able to see other player’s animations.
- Ambient Occlusion: This setting creates realistic shadow transitions between different physical objects, while noticeable, will not dictate the shadow quality. This is why it is usually a separate option from shadow quality. I use this setting to compensate not having Shadows, which will create a more realistic lightning effect while giving some contrast. I recommend to Check this option.
- Best Texture Filtering: This setting will improve the texture quality even more if you have set High on Textures setting, I recommend to Uncheck this option.
- Depth Blur: This setting will add an “out of focus” effect on stuff that is far away, this is a personal choice if you want to have a more stylized appearance on distant objects, I personally Uncheck this option.
- Effect LOD: This setting has a big impact on performance because it will limit the detail of particle effects that may not be necessary to look at all at once. I recommend to Check this option, but if you are specifically looking for something and can’t see it, you may want to uncheck this because it can be hidden.
- High-res Character Textures: This option will override the Texture setting to max out the quality but only on characters and NPCs, It might have impact on performance but isn’t that noticeable, I personally Check this option.
- Light Adaptation: This setting is a personal choice, it is a postprocessing effect which changes the brightness depending how bright it is where you are, it might look washed out in dark areas. I personally Check this option.
- Vertical Sync: This option will force your FPS to match your monitor refresh rate which might help to reduce tearing, however this option while running Windowed Fullscreen doesn’t work as expected. I personally Uncheck this option.
- Motion Blur Power: It controls the amount of Blur when you move your camera or movement, I recommend to set this option at Middle.
NOTE: Remember these settings won’t be the same for every system, it will depend on your hardware limitations, so starting from this point you will need to adjust them for your own experience, try always to aim between 30 and 60FPS while the game looks good enough for you.
For the screenshot purpose just select the Best Appearance preset and be sure to set Supersample, this might kill your performance but it will just be for a moment while taking screenshots.
Camera Settings
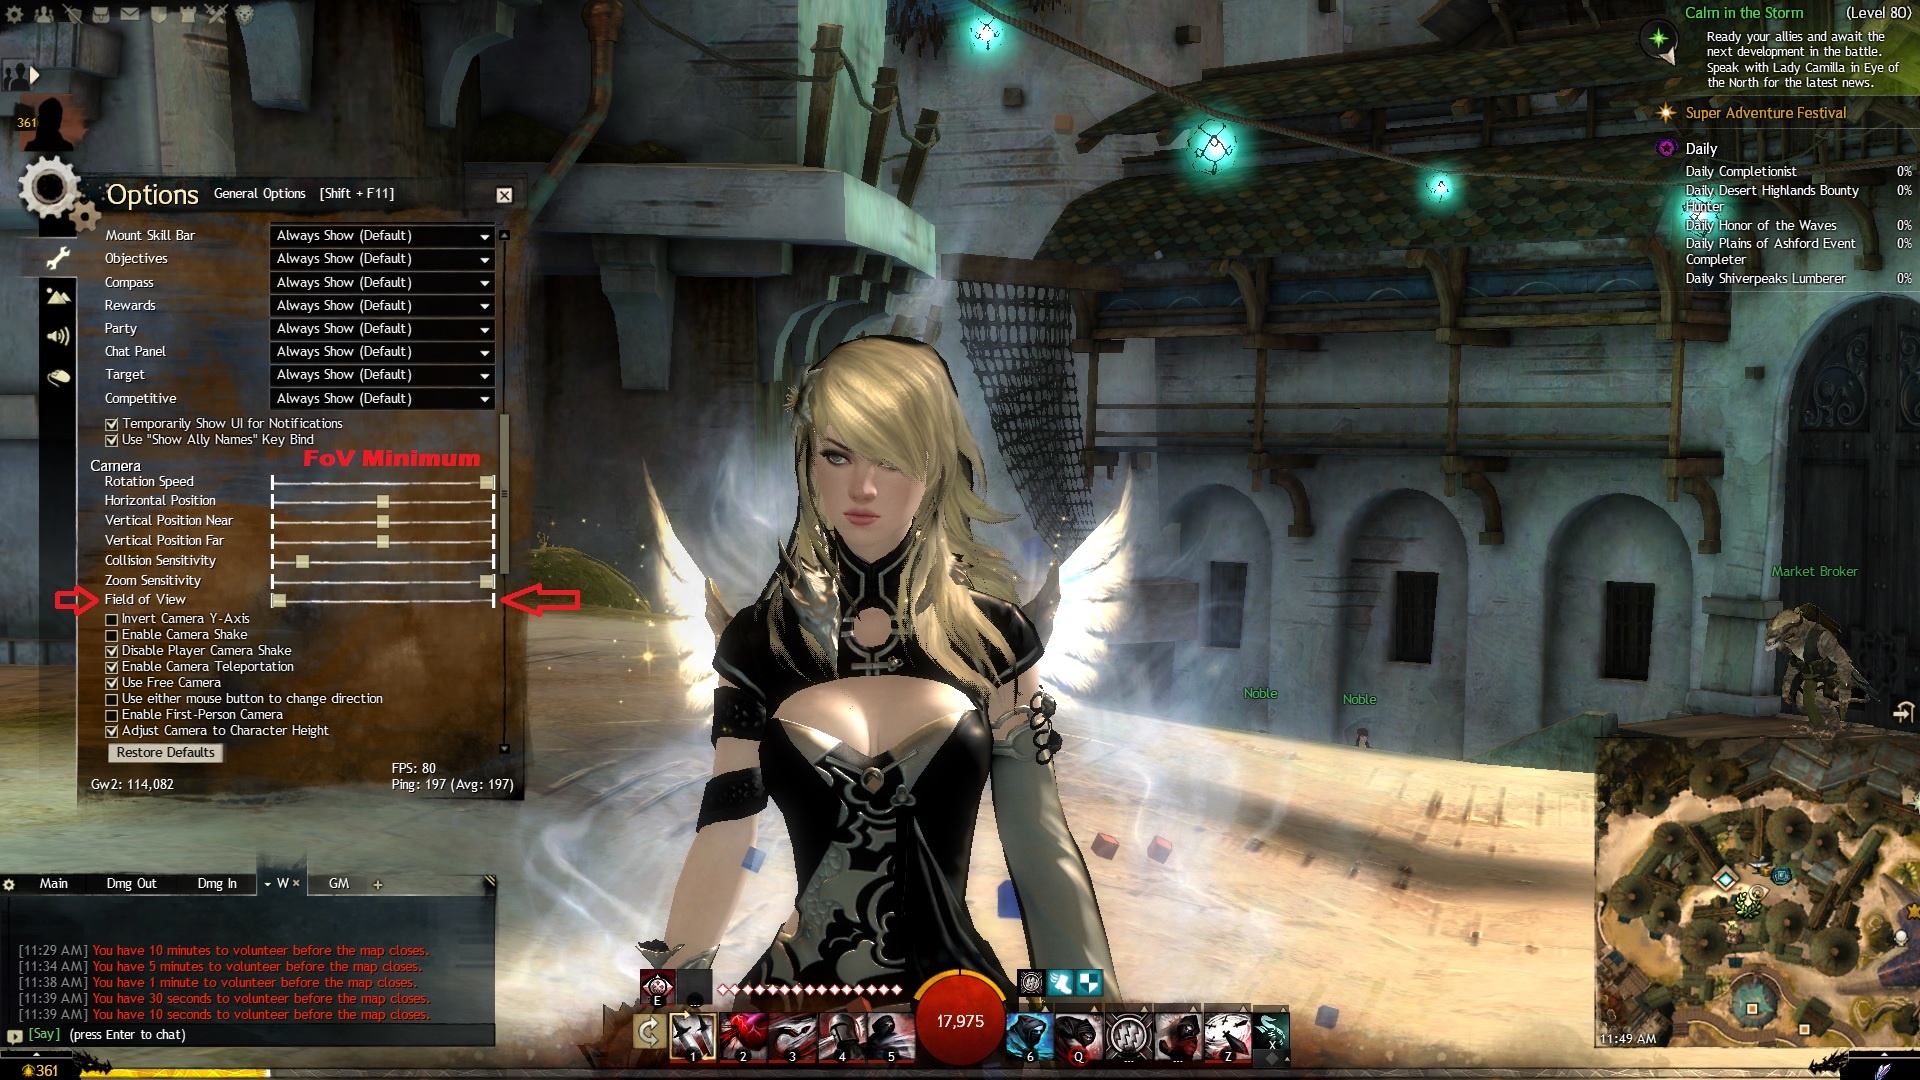
Here you can see my personal settings for the camera options for my gameplay experience, I use these with the Balanced Graphic Settings to improve my gameplay:

- Rotation Speed: This controls the speed of the camera when you rotate it with your mouse, holding one mouse button, I like this at maximum for more reaction time, but a more central setting may be better for a more relaxed wrist and arm movement.
- Horizontal Position: This slider will cause your model to move to left of right side of the screen. Great for simulating different camera angles.
- Vertical Position Near: This slider will cause your model to move up or down side of the screen ONLY when the zoom is close to your character.
- Vertical Position Far: This slider will cause your model to move up or down side of the screen ONLY when the zoom is far away.
- Collision Sensitivity: This slider adjusts the camera ability to ignore collisions with objects. This setting by default is at the position shown in the screenshot, and using higher values will have a huge impact in performance, this option is useful sometimes when you are behind walls or objects and you want to keep your visibility.
- Zoom Sensitivity: This slider controls the sensitivity of your mouse wheel scroll while using zoom.
- Field of View: This slider allows you to control the angle of visibility, having it at maximum is recommended for a fluid gameplay and be able to always see what is going on in your surroundings. This setting will somehow zoom out your character from the screen.
- Invert Camera Y-Axis: This setting will invert the vertical axis of your screen movement.
- Enable Camera Shake: This setting will enable camera shaking. DISABLE IT.
- Disable Player Camera Shake: This setting will disable camera shaking from players.
- Enable Camera Teleportation: This setting is important for a fluid gameplay, it will allow the camera to instant move to a new location when you use a teleport skill.
- Use Free Camera: This is of course the most important setting of all for a good experience. This will allow to move your camera and your character independently of each other, which is very important to being aware of your surroundings.
- Use either mouse button to change direction: This setting will override the default mouse keybinds to rotate your character at same time with your camera. This is NOT recommended.
- Enable First-Person Camera: This setting will allow you to go into first person camera when you zoom in which can be great for screenshots but not that great for gameplay.
- Adjust Camera to Character Height: This setting will override the vertical camera position to match with your character height, I use this setting to easily adjust my camera when I swap races, because there is a big difference in height between Asura and Norn.
So now that you understand each one of the camera settings, it’s time to play with them to find the best angle for our screenshots. Basically what you want to move is:
- Horizontal Position: Left or Right depending on if you want your character shown at one side or to create room to place logos or text next to your character in an editing program.
- Vertical Position: Up or Down depending on the terrain you are posing on which can obstruct the shot from above or below.
- Field of View: While zoomed in, a lower FoV will allow you to go even closer to your character.
Some examples:


Screenshot Settings
By default when you take a screenshot in Guild Wars 2, it will create a JPG file, which will have a big quality loss in order to optimize the size of the file. For our purpose to get the best screenshot possible this is a big problem. So we need to setup the screenshot settings and you can’t do this in-game.
You will need to create a new shortcut of Guild Wars 2 and edit its properties. To do this, open the folder where you have GW2 installed, and right click the executable file, select create shortcut and name this new item as you want, for this purpose I will name it GW2 Screenshot.
Next you need to open this new shortcut properties, right click on it, and press Properties now you need to add a command line argument, simply in the field where it says Target, after the path (after the last quote mark), press space and type -bmp, then press OK to save the settings. Run the game using this shortcut and it will allow Guild Wars 2 to create lossless screenshots in a BMP file, which will increase the quality drastically at the expense of larger file size.
The screenshots you take (PrtScn key by default) will be saved on “…/Documents/Guild Wars 2/Screens” folder or if it is somewhere else you will get an in-game message in your chat box telling you where.


Another possible alternatives can be using the Snipping Tool from Windows to select a section of the screen and save it as PNG file with good quality, and if you have a Nvidia video card, Shadowplay will allow you to capture high quality PNG files as well, I personally use this last method.
Tips and Tricks
Ok at this point we have all the settings done, but we aren’t done yet. There is some important tips to apply as well and some tricks that are important to mention so you can add more value to your screenshots.
Hide User Interface
To do this, you need to press Ctrl+Shift+H in-game to totally hide the UI, this is important to capture the screen without your skill bar, chat, or any other element.

Location – Find a Cool Place
Your screenshot might feature your character but the background is very important, not only to give context and roleplay, but also by the lightning and ambient elements of the zone. If you need some ideas of some chill and cool places to visit, I recommend you watch this video compilation:
Credit to Honey Melon for the video.Day/Night Cycle
Guild Wars 2 has a Day and Night cycle, these are two environment states which affect certain gameplay mechanics, including the appearances of certain weapons, dyes and sylvari glow. In most areas of the game, day and night alternate according to the day-night cycle, sometimes referred to in-game as Tyrian Time. Any zone or instance that does not follow the cycle will be permanently frozen at a particular time. The day-night mechanic is intended as an element of realism in the game; for example, the day-night cycle mimics the passage of real time, and the night state of many underground dungeons reflects the darker feeling of those locations.
This cycle is very relevant to how your character will look, because many elements and skins will react differently to the lightning. See below a comparison as example:


The Light Adaptation setting can affect your screenshots as well, depending on the location and day/night cycle. If the area around your model is too dark you can try toggling this setting. A single day-night cycle lasts for 2 hours in real time, though in-universe it is considered to take 24 hours. Thus, one hour of Tyrian Time corresponds to five minutes of real time, and one minute of Tyrian Time corresponds to five seconds of real time. For about five minutes between Night and Day there are Dawn and Dusk states, where the sky changes between the time periods.
To know on which state the cycle is right now, you can check here for the Timer.
Post Edition
Once you have your screenshot, you can always add more value if you use any software like Photoshop, but if you don’t want to go that far, and still add some value to the images, you can try doing it with filters. For example I have been using this website which is simple enough and allows you to quickly add some filters Instagram-like: PixeLixe
You can see here some examples:


Graphic Enhancers
These are third-party tools that you can add to improve even more the graphics of Guild Wars 2. I don’t use any of these but I feel I have to mention them considering the topic:
- Reshade: A Tool to load shaders that are applied to your game to increase contrast, do wonky things like adding a greenscreen etc.
- GW2Hook: This is a Reshade Version specifically modified for GW2 so that, for example, UI elements are not affected by the Shaders you use.
- d912pxy: not specifically the same as Reshade or GW2Hook but rather a translator for the GW2 DirectX9 calls to DirectX12. Players use that to get more frames out of their games but that hugely depends on their Hardware in which you see more FPS with lower performant Hardware.
If you have any question or suggestion, leave a comment below or join GuildJen Discord to ask questions or share your fashion with us!


