
GW2. New to WvW. A beginner’s guide for Guild Wars 2 World vs World. WvW Guild Wars 2.

Getting Started
The purpose of this guide is to share knowledge about the Guild Wars 2 World vs World game mode (WvW), which is personally my favorite mode and the one I have more experience with.
This guide is intended for new GW2 players or veteran players that have not familiarized themselves with this game mode.
What and Where is World vs World?
World vs World or in short “WvW”, is a game mode that Guild Wars 2 uniquely features, allowing players to experience a unique combination of “Player vs Player” and “Player vs Environment”. It’s basically the closest thing that this game offers to “Open World PvP”.
Players take part by representing a World or Server, and each match contains three Servers, so it’s actually a World vs World vs World. This game mode allows you to take part in massive battles, small scale fights, taking and defending Keeps and Towers, the use of siege weapons, and to battle over resources around the maps. Each match has a duration of an entire week, so it is a game mode that relies on community organization and tactical communication just as much if not more than skill.
Credit to Vallun for the video.There is an intended way to play WvW which means understanding the Score System and playing to win, but ArenaNet didn’t assign much development work over the years to WvW and by the lack of incentives to win, the score became meaningless for the majority of the player base. However, due to the sandbox nature of WvW, players have found alternative ways to keep enjoying the game mode and basically creating their own content, as to fights, roaming groups, etc. I am still playing it as my main game mode and I never get bored of it, in my opinion World versus World is the true End-Game of Guild Wars 2.
Most people enjoy the combat system of Guild Wars 2 which many believe (including me) to be superior to any other MMORPG. WvW offers so many options to play the way you want and since it’s a very social mode, you can find people who have similar interests.
To join the battle in WvW, you can access from the World vs World panel (default key B) and select which map to enter (you can also click the castle icon in your toolbar)

There are two options for playing Guild Wars 2, and these will affect when you can first start playing WvW:
If you are a new player, depending which type of account you own, you might need to reach a certain level to be able to participate in the Mist War.
- Free to Play Account: Unlocked account-wide once one character reaches level 60.
- Expansion Account: Unlocked account-wide once one character reaches level 31.
Since WvW is an end-game feature, it is suggested that you join the battle when you are already level 80 and you own good equipment. However, once you are there, you will be automatically up-scaled to maximum level to not feel much disadvantage, it will still feel like you won’t be able to accomplish much versus players with good equipment but it’s still an option if you want to try.
For this reason I would check this guide to prepare yourself to enter WvW:

Servers
When you create your account you have to choose a Region (North America or Europe) and each has different servers/worlds. North America (NA) has a total of 24 worlds and Europe (EU) has a total of 27 worlds.


These worlds are grouped into a 3-way matchup based on their previous week’s performance. They will either progress into a higher tier, go lower, or stay in the same tier depending on their placement: 1st 2nd or 3rd. The game doesn’t show this information on the user interface (which is disappointing) but you can still know if you check on this website: GW2Stats.com
If you are wondering “What server should I choose?” I would say the server where your guild or friends are. Also if you are on EU and wish to play with French or German speakers, choose those indicated by FR or DE. Once there, you will have your own experience to know if that server is good enough for you, based on what playstyle is more popular, and how active the population is during the time zone you play. Higher population servers may be more active, but also you may have to wait in longer queues. If you prefer larger fights, higher population is better, but if you like the freedom to play when you want, choose a medium population server.
If you really need to move to another server you can transfer but it has a Gem cost. There are cases when you want to transfer to a friend’s server but it’s full, and sadly you can’t do anything about it. This issue hopefully will be fixed with the new “Alliances” system which is still under development.
The stats to determine the population of each server depends on many things, but soon servers will be restructured. Servers will still be based on a matchmaking system, but composed mostly of guilds, and groups of guilds called alliances. The server will be created by many different sources of players who choose to play together by representing an specific guild.
Alliances are still under development (long time) and recently we started to have some “beta weeks” to see how things are improving. Hopefully this new system will be the final solution for the barrier of limited server slots and allow you to always be free to play with your friends.
Maps

There are four main maps in World vs World. There are some optional maps like Edge of the Mists and Obsidian Sanctum, but they are designed for non-standardized play. No matter what server you are on you will have access to Eternal Battlegrounds and then three borderlands that each belong to a server in the current matchup.
- What is the purpose of Eternal Battlegrounds?
Eternal Battlegrounds is the most neutral map. Each side has their own territories that are closer to their spawn, but there is a massive objective in the center called Stonemist Castle which is worth the most points per tick out of any objective. However, this objective can be a great ordeal to overtake and may not be worth sieging if it is heavily defended.

Then there are three borderlands. Each server will own a borderland which means they will have a much greater advantage because their spawn will be closer to a central area of the map. For example if the three servers in one matchup are Fort Aspenwood, Jade Quarry, and Maguuma, there will be a Maguuma Borderlands, a Jade Quarry Borderlands, and a Fort Aspenwood Borderlands. Though each server has an advantage on their own borderland, every server has their own borderland which balances it somewhat.
- What is my home server map?
You can find your home server map by looking at the WvW panel. The one with the icon of the house is your server. You can hover over the icon to see which server is exactly yours, denoted by the (*) not the (+). Once you know your server, just join the borderland with that name. You will spawn from the Citadel and have quick access to defending Inner Towers and the Garrison.

- How Is my team side and color determined?
Teams are determined by the score of the previous matchup. Usually a server will go down a tier, a server will go up a tier, and another server will stay in the same tier. The servers with the highest standing in the previous matchup will be Green. The second highest will be Blue, and the lowest will be Red.
There are differences between these borderlands. There are two types of borderlands. There is the Alpine Borderlands and the Desert Borderlands. Red team will always have the Desert Borderlands as their home borderland and Green and Blue will own Alpine maps.
- Do the maps and colors favor specific teams?
Yes. First of all, the colors and sides are determined by the performance of each team on the previous match. This means the Red team is most likely to lose, and the Green is most likely to win. Of course this can change based on many factors and the matchups are by no means fated.
In Eternal Battlegrounds, Green side is a swamp with lots of water, making their keep harder to siege because of the natural moat around it, but their outer towers have many mountains nearby to be sieged from. Blue is more balanced. Red keep is elevated on a mountain, but many of its towers are isolated and difficult to reinforce.
On the Borderlands, Green and Blue will get the same capabilities with Alpine Borderlands, but Red will get the Desert Borderland map as their home borderland, which can be harder to defend and respond to enemy movements.

Some sides have different terrain which can provide tradeoffs in different situations, but for the most part each side has a fair stake at winning a map’s objectives. Strategy, numbers, and compositions matter more than color.
- Why is one borderland different?
Originally all three borderlands were the same map, the Alpine Borderlands. The Heart of Thorns expansion added the Desert Borderland map, and it became the Red team home borderland map.
Alpine Borderland has some hills and lakes but mostly it does not have that much terrain. The main keep on the alpine borderland map called the Garrison may even be harder to siege than Stone Mist Castle because the home team will have such an advantage with their spawn right next to Garrison. While Stone Mist Castle can be easier to defend it is not so one-sided.
Desert Borderland is much larger, complex, and the objectives are spread out further. There is a lot of verticality and terrain as well as many biomes. Because this map came out with the Heart of Thorns expansion, it increased the difficulty of the lords and added new mechanics to the objectives. In ideal circumstances this is the most engaging map. However, when it isn’t very active the map can feel barren because it takes so long to find fights.

- On which map should I play?
It is recommended that new players look for a commander tag on any of these maps and follow it until they get used to the objectives and knowing where is safe and where they are needed.

If you are playing to win, that would depend on where the enemy is going, where your commanders are; and what objectives need defending, and which objectives are open to being taken. If you enjoy defending and your build is specialized for that, go somewhere your team already owns objectives like your home borderland, and if your build specializes in mobility and securing kills then go somewhere your enemies have more presence like the enemy borderland so you can go behind enemy lines.
- Eternal Battlegrounds
- If you are solely looking for “zerg” fights then generally Eternal Battlegrounds is the best map for big fights as it isn’t too large and it provides a balanced experience between attacking and defending, but not necesarilly balanced fights
- Alpine Borderlands
- Will have less big scale fights outside specific attempts, like attacking/defending a Keep, and instead these maps become the best alternative for small scale combat and roaming
- Desert Borderland
- Is generally the worst for finding fights but at least the scenery changes frequently with the many biomes, the action is less and can take more time to find fights, maybe it’s the best option to play more relaxed
Also if you prefer smaller fights because your PC can’t handle the lag of large fights or you are a roamer, borderlands are always a better option.
- What are Queues and how do they work?
The main WvW maps, have a capacity limit, equally balanced between all three servers, and once this limit is reached the map will gain a queue.

While you are in queue, you can swap maps without losing your place, but swapping characters will drop you from the queue. Edge of the Mists is different because it works with the Overflow and Mega Server technology.
Capacity limits are based on the server resources being used. The limit number is split equally among all three worlds but it’s still unknown the exact number.
- What is Edge of the Mists?
Edge of the Mists is an alternative map for World vs World which is not very popular. It was a test map for the Megaserver System and to allow people to play there while they wait for other maps queues, but due to not having the same rewards as a normal WvW map and a 2 hour reset timer rather than the weekly reset of normal WvW maps, it feels inconsequential to play there.
There are two other maps that are part of the mists, but they aren’t relevant to the World vs World Score System. These are Obsidian Sanctum, which features a big jumping puzzle, and Armistice Bastion.
- Is it worth it to buy a pass for Armistice Bastion?
Armistice Bastion is mechanically a WvW map. Team chat /t is visible, build templates will automatically switch to the one most recently used in WvW and only the Warclaw mount may be used.
You can only access this zone by buying a Pass from the Gemstore:
- – 1000 Gems (Not always available)
- – 150 Gems
If you are a WvW player, this VIP area is the best location that you can buy, because, besides all the services that it offers, it has a unique feature which is the ability to practice and duel with proper WvW balance, since the Guild Hall arena uses PvE balance. There are golems to hit if you want to theorycraft a build. This is the best place to hold scrims or hang out with friends that aren’t in your current WvW matchup.


You can fight other players in Armistice Bastion by leaving the courtyard and going to the Gladiator Pits. There are three flags here and grabbing one will essentially put you on a team as does WvW with the three different colors. This allows you to set up duels, 3v3s, or even have 5v5v5s like in actual WvW. Using the special action key or dying will allow you to repick a flag.


Playstyles and Builds
World vs World can be played solo, in small groups, in massive groups, and anywhere in between. For simplicity we will separate the playstyles into the main two:
Roaming
Roaming usually involves parties of 1-5 with each member playing a similar role of having a decent amount of self-sustain and mobility to be able to handle disengaging lost or unfavorable fights. There can be roles within a roaming group like hybrid supports and DPS but generally it is more effective to play builds that are role-independent when in smaller fights. Still you can bring utility to allies and just by being aware of their positioning will make a huge difference to split the enemy pressure. Roamers will usually look to capture and defend smaller objectives or look for kills on other roamers or isolated players to split the enemy zerg. Roamers can totally engage in bigger groups as well and attack their backline and bait cooldowns.
Roaming exampleZerg
Zerging usually involves parties of 15 or more with each member playing a specific role within the group. By themselves, zerging builds have many weaknesses, but when grouped up with other zerg builds that fill in those gaps by giving you mobility, giving you boons, healing you, or demolishing the enemy they become deadly efficient. Zergs will often go for the largest objectives on the map and attempt to siege and wipe out the enemy frontline forces. Usually you will be following a Commander Tag and joining their squad you can participate more actively on the group. Some very organized groups might ask you to join voice comms and run specific “meta” builds but you aren’t forced to do it if you don’t want. However, if you decide to join comms or even a guild is always a good decision as you can learn by listening to the commander calls.
Zerging exampleYou can check all the builds that you might need for every playstyle and every class here:

While it is more likely that a Necromancer and a Guardian will be more useful zerging and a Thief and a Ranger will be more useful roaming, these are not hard defined roles. Elementalists, for example, can build very high damage modifiers with a staff to specialize in dealing ranged damage which will require support from others and large scale fights to land its attacks, or they can build for healing within the zerg. They can also change their weapons, traits, and stats to be more self sufficient for roaming scenarios.
There are definitely more specific playstyles than these, such as scouting or gathering intelligence by yourself to alert the larger groups on your server. But this could also be categorized similarly to roaming or done by a roamer. There are also smaller zergs called havoc squads who don’t look to capture objectives as much and specialize their builds only for killing other players. Their main purpose is to fight or take chunks out of other zergs so they can also be categorized similarly to zergs.
And ultimately roamers or random players can converge under specific situations to defend or attack as group forming a PuG Zerg (or also called “cloud”) which will lack organization but the numbers can still make the difference.
Because each map in WvW has a player limit, utilizing the resource of your troops may mean splitting up. If you just stack into one zerg the other servers can stall and defend while smaller groups capture other objectives. This leads to what the objective of the game mode is and how or why you should play for it. At the end of the day, diversity will provide your team benefits and every player has different tastes so play what you wish.
Ranks and Masteries
While you are in WvW you will gain a special kind of experience called World Experience (WXP). You will earn this by completing relevant WvW activities, including killing enemies, capturing objectives, defending, etc.
So instead of getting levels, you will get ranks, and these ranks gives you World Ability Points and other rewards. You can use these points to upgrade your exclusive WvW abilities that can be considered as “Masteries”.
Your world rank increases as you gain WXP through your accomplishments in WvW. The first 4 ranks (up to rank 5) only require 1,000 WXP; after that, each rank requires 5,000 WXP. There is a maximum of 10,000 ranks that can be achieved; WXP rank rewards passed rank 10,000 will not include additional ability points. However, currently to max out all the abilities you will need just 1,226 points.
Each rank will also give you a title. Your rank title, together with your server name, is shown to enemy players instead of your character name.

WvW Abilities (Masteries)

You can see in the interface the different upgrades where you can spend your points, I won’t list them all here but I will recommend you which are the most important to start with:
- Warclaw Mastery
- War Gliding Mastery
- Provisions Master
- Supply Capacity (Can skip if not interested in group play)
- Defense Against Guards
- Guard Killer
- Mercenary’s Bane
- Siege Bunker
- Siege Might
- Catapult Mastery
These are without doubt the most important and the ones you should start with
For the Warclaw Mount you can follow this guide to know how to unlock:
Warclaw Mount

NOTE: You can reset your ability points by buying an Ability Reset Guide from the World Ability Master in the spawn area.
Currency and Rewards
WvW has a unique system to reward players that is a hybrid between the PvP one and the participation one that we can see in some PvE maps like for example Verdant Brink. Just like PvP there are reward tracks that you can choose which reward you get, and then there is a second reward track based on skirmish pips that everyone progresses.
The “Skirmish Reward Track” has a global Reward Track and Weekly Chest based on Pips. You will get rewards over time through active gameplay. You need to do events like taking objectives, defending, or killing enemies in order to maintain your participation. Participation is also the way you progress the themed Reward Tracks:

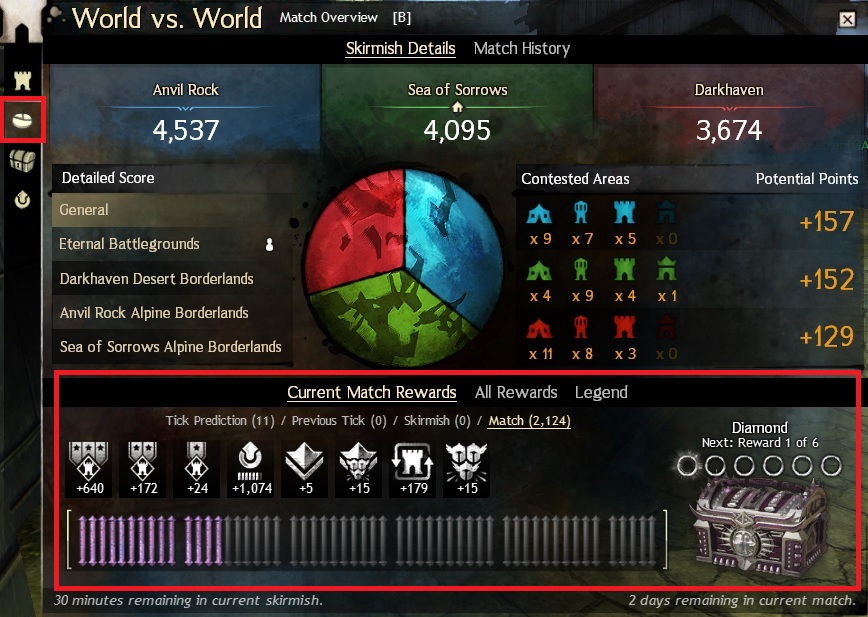

You need a minimum of Tier 3 (90) participation to be able to gain pips, which will progress the rewards for the weekly chests. While these chests gives you progress towards the reward track, you will aim to maintain your participation to max level (Tier 6) for faster progress in the reward track.
When you are inactive, your participation will decay, and you will start losing it slowly until it’s fully depleted. When you are outside WvW the progress won’t decay.
Currency
- Badge of Honor
- Acquired from random drops by NPC or from Bag of Loot dropped by enemy players. There are another ways to get them like from Jumping Puzzles and Skirmish Chests.
- This currency is mostly used to buy equipment and siege blueprints
- Testimony of Heroics
- Earned by ranking up in WvW or can be purchased from Skirmish Chests. Testimony of Heroics can be exchanged for Path of Fire Hero points as well as Path of Fire items at Heroics Notary.
- WvW Skirmish Claim Ticket
- Earned by completing tiers of the Skirmish reward track (Pip Weekly Chests)
- The maximum number of Tickets that can be obtained in one week is 365.
- This currency is the most important in order to get ascended equipment and legendary.
I suggest you read these guides in order to know more how to get ascended and legendary equipment:
- Ascended Gear – The complete guide
- WvW Legendary Armor Guide
- Legendary Back Item Warbringer Guide
- Legendary Ring Conflux Guide
Objectives and Siege
In WvW there are four major types of objectives that contribute to the score by points per tick. Other than killing players, score is obtained every 5 minutes and the amount of score gained depends on how many objectives and their respective values are held when the “tick” occurs. Depending on the type of objective and how upgraded it is, there are a number of defenses that must be overcome before it can be captured:
- Camp – Guards
- Tower – Guards – Walls/Gate – Champion Tower Lord –
- Keep – Guards – Walls/Gate – Champion Keep Lord – Inner Walls/Gate
- Stonemist Castle – Guards – Walls/Gate – Legendary Castle Lord – Inner Walls/Gate


There is one more important mechanic to know about objectives, and it is the Righteous Indignation. Every time an objective is captured or “flipped”, not only will every NPC ally with the new owners of the keep, but the Lord NPC will gain a buff called Righteous Indignation or in short “RI”. This makes the Lord NPC invulnerable and gives it a significant damage boost, which lasts for 5 minutes. This means that the tower cannot be captured until 5 minutes after it has been flipped.


Using certain siege you can assault these objectives:
- Arrow Cart – Shoot players and siege in a large area with arrows without respect to line of sight.
- Ballista – Shoot a specific area at very far ranges with massive damage to siege. Must have line of sight.
- Flame Ram – Can do massive damage to gates, but most be next to the gates and can only damage gates.
- Catapult – Shoot from range. Can knock players and damage walls and gates.
- Trebuchet – Shoot from very long range. Can knock players and damage walls and gates from very safe positioning even inside adjacent objectives.
- Shield Generator – Block players and shield them or siege from other siege weapons.
- Siege Golem – Allow a player to get inside the golem and move around with the ability to break gates, or walls with superior Golems.


Supply is a resource that you can use exclusively in WvW. It is used to repair structures, build siege, lay traps, and upgrade objectives. While certain siege can counter others, there is always a limited amount of supply to make you decide how to go about your assault or defense of an objective. You can see in the middle top of the screen how much supply you are carrying right now:


Camps are the objectives which generate supply over time. No you don’t need to fish or farm or mine the supplies, the workers will do that for you. Just grab them from the depot which can be found on the minimap as a keg icon. You can also get supply from other objectives like towers and keeps, because supply caravans (dolyaks) will periodically deliver supply to the depots of nearby objectives. There is also a chance to get supply when you kill enemy dolyaks.
To build siege weapons a player needs to use a Blueprint, a consumable which can be purchased on the trading post or through vendors. When consumed it will give you a bundle which you can throw on the ground to create a build site. Then players need to spend their supply on it to finally build the siege weapon.
Usually if you are following a group, you should wait for your commander to drop the siege and use your supply to build the weapons. If your commander drops multiple siege blueprints at a time, the unspoken rule is that you should build from left to right to ensure at least one gets built instead of building multiple incomplete siege.
If you would like more information on the specifics of tactics, objectives, and building your territory up, check the guide below:

Communication
WvW is a game mode where teamwork is essential whether it is calling out approaching enemies to prepare everyone for an attack, solidifying a composition, or to recruit for guilds. To accomplish several things you need to know how to communicate with your team.
In-Game Communication
In-game the communication is done via map chat (/m), team chat (/t) squad chat (/d) if you are part of one, and say chat (/s).
Team chat (/t) in WvW works across all maps, so in order to avoid confusion, it’s important that you activate the option “Show Channel Tag” in your chat options, to know from which map that player might be giving information.

Team chat is useful for calling for reinforcements from other maps, since the specifics of combat wont be too important to players not even in your map.
Map chat (/m) will only publish to other players on your map and usually players use it for more specific scouting like where the enemy is and how many of them. You can do this in team chat as well, but you should specify which map that information is relevant on then, since it could be any of them.
Squad chat (/d) or even party chat (/p) will only be visible to those in your party or squad. A squad is generally larger than a party, and multiple parties can exist within a squad.
Say chat (/s) will only be visible to those within 2000 range of you. You can use say chat and party chat to have a bit more immediacy to your group because chat bubbles will appear above your head (if they haven’t disabled that).
Try to keep chat in appropriate channels not only so that you don’t spam and confuse others, but so that the people who your chat is directed to will know who it’s for.
Players cannot see any of the chat channels from enemy servers except for whispers or if you add them to your party or squad. They can see your emotes though like /laugh, /bow, and custom emotes using the /em command. Players will see the rank and server instead of the characters name, and custom emotes will only come up as an indistinct gesture. You can specify who your emote is directed at by placing an “@” after the emote. So you can do a /beckon @ and it will create a message like “Maguuma Invader beckons at Yak’s Bend Soldier.”
More Organized Communication
You can go even further than in-game forms of communication. Guilds and several server communities have their own Voice chats on third-party software like Discord, or Teamspeak. This allows more coordination with the group and is often required if you want to join a specific group/squad. You can ask in your server team chat for links to their server groups to join if you want to participate.
Another important thing to know is how to communicate effectively to achieve what you want. Using abbreviations and concise communications that others are familiar with will reduce the time it takes for a response. Scouts will let their team know about which objective is under attack or someone might want to coordinate with another group which objective to focus. Identifying the location using objective cardinal directions (NESW) and accurate estimations of numbers and times will provide much better results for you and your team.
Optimization/Settings
One of the biggest issues players have with WvW is that it can cause them to lag and lose FPS. This is generally caused by the large number of players that can be in one place at one time. Sometimes this is unavoidable, but there are some things you can do to minimize your performance lag while also maintaining decent graphics.
In your settings menu’s General Options you can reduce lag and make the screen more readable under the Competitive section.
- Team Colors
Will make everyone of a certain team have a solid color appearance (Blue, Red, or Green) rather than a bunch of complex dyes they chose. This can reduce the amount your PC has to render and will also make it very clear who is on what team.
- Standard Enemy and Friendly Models
When enabled will make every player of a certain class have an identical appearance. So every Ranger will look the same, but they will look different to a Warrior or a Mesmer. This can help you to learn the animations of certain classes better because different races can have different animations for the same skill. This can also remove a lot of the flashy equipment effects that players use because the standard model is very simple and will make your game look much cleaner and run better. I personally do not use standard models because I feel that it removes a lot of the fun of knowing who you are fighting. However, if you are having performance issues this can be sacrificed.
- Simple Nameplates
Will change the name tags above each character from a lengthy text that includes their server and rank to simply their guild tag and a colored shape to denote their team. You can still see their rank by targeting them, but all the necessary information is made much more concise which is especially good for large scale situations where all the nameplates can clutter your screen. In smaller scale situations it may be better to have more information on the screen so you can disable this option if you feel that is the case.

The second tab of your settings menu is the Graphics Options. The most important things to reduce are Reflections and Shadows if you want to improve your performance. They provide the least amount of detail for the amount of strain they give to your PC.
- Character Model Quality
Affects how much detail characters other than your own character are given. I put this to low because it is not that important for me to see how much detail they have in the middle of a fight, but just a general idea of what they are wearing is enough for me.
- Character Model Limit
Affects how many players and to what degree they are animated from your perspective. I put this on low because if you put it on lowest it makes characters look like blobs and you can’t really tell what they are doing to react to them.

- Effect LOD
This is like the Character Model Limit option but for spells and other animations that aren’t based on character models. Turning this on will remove a lot of spell effects that you may not even be able to pay attention to anyway, so in a lot of cases you wont see a difference because there is so much going on anyway. However, it can also remove very specific spell animations that you really need to watch out for. Decide for yourself whether you want to see everything that comes at you or you want a little better PC performance. If you died to something you didn’t see coming, you may want to take this off. Also, if you have a hard time focusing on animations when there are too many present this can be good to enable.
Another important factor to consider is your Ping/Latency. If your skills aren’t casting when you want them to, it can be disorienting and ruin your rhythm. Sometimes this isn’t your internet’s fault, but if you are far from the servers (EU is Germany, NA is New York) this can be a persistent problem and you may want to try a VPN. For this purpose you can check WTFast.
User Interface
Guild Wars 2 combat is a mix between action combat and tab targeting, so you need to be able to look at the User Interface and quickly gather information while also having good visibility of the animations of each player. Here are some of the main elements of the UI and how you should interpret the information they provide you.

- Party Window
Whether you are in a squad or party you will be able to see the health of your teammates and be able to target allies by clicking on their health bars. Targeting them will highlight their character in the world and make them easier to find which will allow healers to get in range of them. Squads will show how many players are in the squad and the sum of every player’s supply in the squad which can clue to the commander how many blueprints they can drop.
- Chat Window
Chatting can be useful while moving between objectives and fights, but with all of the information that goes on in WvW, it is hard to communicate with people during battle. For this reason, many groups will go use voice communication, but with how many groups there can be participating for the same purpose you can’t have everyone in the same call. Use concise but specific information to help your team. Saying “our tower is under attack” isn’t too helpful, but “15 blues at NE tower Green BL. No siege down yet” is significantly more helpful.
- Score
The on screen score does not tell you all of the information you will need. Generally you will open the WvW Panel to look at score, but while in combat or scouting you may not have that luxury. The on screen score tells you what your server’s Points Per Tick is, which is the sum of the value of all the objectives your server owns. There is a visual comparing each server’s PPT with bars representing each color. It will tell you how much time is left in the tick, so if you are really trying hard to cap something to make it count for the next tick you will be racing that countdown.

Then below it will also show how much time is left in the skirmish, which is like a longer term tick giving victory score (the final points that decide who wins the matchup). Also it will tell you how much supply you have. Hovering over elements of the score UI will tell you more specific information. Hovering over the symbol to the left of your score will tell you information about the objective in which territory you are in such as who owns it (important to know because you cannot glide in enemy territory), what kind of objective it is and what it is worth, and how upgraded it is.
- Enemy Class
Learn these icons well because like any RPG how you play depends on what you are up against. These icons will also reveal to you some of the enemy’s build. Seeing the Guardian icon means that they are not using an elite specialization. However, seeing the Dragonhunter or Firebrand icons (which are the two elite specializations for Guardian) tell you what one of their trait lines is immediately.
- Enemy Buffs
When targeting an enemy you can get a lot of information about them. Generally large groups of players will share boons to each other so you can’t isolate and focus players unless you strip those boons. In general you won’t need to look at specific player buffs in large scale fights, but in smaller fights paying attention to the enemy buffs is very important. If they have the aegis boon (blocks next attack) you want to do a low investment quick attack to remove it. If they have stability (ignores one CC per stack) wait to use your CC skills or use boon rips. Resistance (ignores condition effects during its duration) can be countered by CCing them while they have it or saving your conditions and only using power damage.
- Objectives
Your daily achievements and any nearby objectives will appear in the top right of your screen. These can show the progress of a capture point and who owns it. You can also see how much supply is left in an objective which can give you a general idea of how long it will take to siege if players are willing to defend it.
- Mini Map
Your mini map is a tool to provide you with a lot of information. You can hover over it and use your mouse scroll wheel to zoom in and out depending on whether you are trying to find something and need a wider view or if you are in an engagement and need a more focused view. You can also hover over objectives to see whether they have RI, if they are contested, and whether they have upgrades or tactics. You can also left click commander tags to easily join their squad.
If you see Orange Crossed Swords on the map it means that at least 25 players are in combat in that area. Also objectives that have been contested within the last 3 minutes will have White Crossed Swords on their icons. If you are looking for fights, look for these.

- Combat Text
Whenever you hit an enemy for damage or heal an ally you will see a numerical value near that character. White numbers represent damage dealt and white letters with a red explosive background represent critical damage. Green numbers represent healing and blue represents barrier given or received.
- Buffs/Debuffs
Here you mainly want to check which conditions are on you and whether or not you need to cleanse them. This information may also influence your behavior such as if you see you have a lot of torment on you (deals more damage to moving players) don’t move unnecessarily; or if you have confusion (damages you each time you use a skill) on you don’t use skills unnecessarily. If you are blinded (your next attack misses) your screen will have a shadowy perimeter as well as your buff bar will show the condition, don’t waste an important skill while blinded. If you have a lot of damaging conditions on you, cleansing is important. The priority of condition cleanse can sometimes be unreliable but generally the conditions to the left on your buff bar get cleansed first.
- Meters
Your health and endurance meters are good indicators for how much of a buffer you have to overextend. If you are at full endurance you can overextend a bit and then dodge back to safety. If you are low on health you should stay back and resustain.
- Rank
Your current WvW Rank and the experience progress towards the next rank.
- Rewards
Hovering over the chest icon above the mini map will give you more detailed information about your participation levels, including exactly how much time is left until you start decaying participation and what tier of reward you are on. Reward chests will also pop up here when the 5 minute scoring tick occurs. As long as you are actively engaging in the game mode you shouldn’t have to worry too much about this.

Once you understand all of these things, it takes some time to practice your mechanics, learn the classes and matchups, and find a guild to run you enjoy playing with. There are plenty of guides out there for each class on this site, but the two most important things to learn at first, which will help you with almost everything else in the game is controlling your character’s movement and how your skills target enemies.
Targeting:
Movement:
Frequently Asked Questions
Q: If I die but my zerg hasn’t wiped yet, how can I avoid being ganked while returning to my squad?
A: If there are others running back with you, take the most travelled paths or the dirt roads and stick together. If you are running back alone, take side routes because gankers usually look for kills on players in the places they can find them the easiest.
Also you can utilize build templates to make a set of traits and utilities, which cost nothing to make and can use your normal build gear, to give you extra mobility through swiftness and have invulnerabilities to survive long enough to make it to a safe point. Then swap back to your normal build template when you reconvene with the squad. The optimal will be to setup a roaming build and a zerg build, check more on this guide Guild Wars 2 Build Templates Guide
Q: My server is dead during the times I play, how do I keep up my participation to gain pip rewards while outnumbered?
A: Camps and Sentries are the best objectives to capture for increasing your participation. Once your participation is high you can maintain it by simply defending towers you already own or using siege to damage walls. Hitting a wall with a catapult or trebuchet from the safety of a high ledge or tower can help you to keep participation. Repairing a wall or fending off attackers who tag your objective (triggering the 3 minute defense event that contests that objective) will also give participation. Even if you are not very good and can’t kill other players in even fights you can still maintain participation through killing NPCs or objectives without walls.
Q: What Is PPT?
A: Literally Points Per Tick, PPT is the amount of war score your team will earn every 5 minutes. It represents how many objectives your team holds on all maps and how upgraded they are. Players tend to want to interact with other players through fights around the objectives, but some players will try to avoid fights to focus on capturing objectives that go undefended, or focusing purely on the PPT. While this may be frowned upon as an unfun playstyle, what most players do is a combination of PPT and fights. It is necessary to engage in PPT even if you want fights because you need to entice enemy players to defend their objectives which will often create the engaging content players look for.
 Questions and Discussion
 Feel free to join GuildJen Discord for more discussion and questions related to anything. New players are always welcome.


Very comprehensive, but I didn’t see anything about being able to see the Tiers.
There’s no mention of the Ladder.
You can only see the biggest of big pictures on third-party websites like: http://gw2stats.com/matchups
I do mention GW2Stats, and actually I did modify this guide many times trying to make it shorter each time, so the information about the coverage and about tiers is no longer there. WvW can easily overwhelm new players, it’s complicated to know how much information they will take at once. At this point is not that relevant anyway, we will have Alliances soon and servers/tiers will be gone. A new system/leaderboard will born eventually.
also no mention of a mount and when you get that, yes yes every stupid person mentions warclaw i have that maxed no mount. try again.. i dgaf about warclaw i still can’t mount.
love your guides, i have really been enjoying wvw but no one trains it, just join a group and be expected to know everything. so thank you!! always appreciate how digestible you make difficult content.
I never looked at the guide for wvw, all the things came together after playing only a month but one thing I haven’t figured out (actually it didn’t came by itself nor was I trying to figure it out) is Tiers of objectives (towers,keeps,camps) and how exactly are they being upgraded.
Here: https://guildjen.com/guide-to-objectives-upgrades-improvements-and-tactics-in-wvw/