

GW2. A complete achievement guide of the Living World Season 4 Episode 2 “A Bug in the System”
A Bug in the System (Story Journal)

“A Bug in the System” Mastery – 21AP
This is the meta achievement for which you need to complete 35 eligible achievements. The reward for this is an Olmakhan Mantle Box.


Story Completion Achievements – 0AP
Tracking the Scientist – 0AP
Journal: Tracking the Scientist
Complete the story chapter “Tracking the Scientist”
The Test Subject – 0AP
Journal: The Test Subject
Complete the story chapter “The Test Subject”
A Kindness Repaid – 0AP
Journal: A Kindness Repaid
Complete the story chapter “A Kindness Repaid”
The Road to Rata Primus – 0AP
Journal: The Road to Rata Primus
Complete the story chapter “The Road to Rata Primus”
The Charge – 0AP
Journal: The Charge
Complete the story chapter “The Charge”
Story Instance Achievements – 20AP
Gate-Crasher – 1AP
Story Instance: Tracking the Scientist
For this achievement you need to reach the tracking network authentication puzzle under 5 minutes without fighting any inquest. You don’t fail the achievement by being spotted as long as you don’t engage in combat (at the third detection you will automatically be put in combat, but you will fail the next achievement if you do them together). The timer is pretty close and might take a couple runs until you know the route. Check the video below to know how to do it:
NOTE: This achievement is mutually exclusive with “Talk to the Fist”, you will need to run the instance at least twice.
I Make This Golem Look Good – 2AP
Story Instance: Tracking the Scientist
You can do this achievement and Gate-Crasher together, but for this one specifically you need to avoid being spotted by the drones, you can’t be detected even once. You will also need to reach to the puzzle and solve it on the first try. Check the video above at “Gate-Crasher” that shows how to do both.


NOTE: This achievement is mutually exclusive with “Talk to the Fist”, you will need to run the instance at least twice.
Talk to the Fist – 1AP
Story Instance: Tracking the Scientist
This achievement is the opposite as above, you need to be spotted by a drone and answer with the aggressive response to engage combat. You need to do this twice and you only have two opportunities before the drones stop offering the dialogue options.


NOTE: This achievement is mutually exclusive with “Gate-Crasher” and “I Make This Golem Look Good”, you will need to run the instance at least twice.
Drones Disabled – 2AP
Story Instance: The Test Subject
Disable the drones in lab Sigma-05. To do this you need to interact with the first console once you get in the instance to set the password to “password”, then continue your path without being detected by the drones to access the second console in a side room on the left, using the option “Access drone controls”.


Inquest Redundancies – 1AP
Story Instance: The Test Subject
For this achievement you need to kill all the Inquest enemies on the instance, not including the Attack Drones. There are groups of Inquest enemies on the first two floors and the entire room on 3rd floor as well.


Inquest-Specimen Liberator – 1AP
Story Instance: The Test Subject
At the second floor you need to release all the specimens. there are four of them, interact with their chamber to get the achievement.


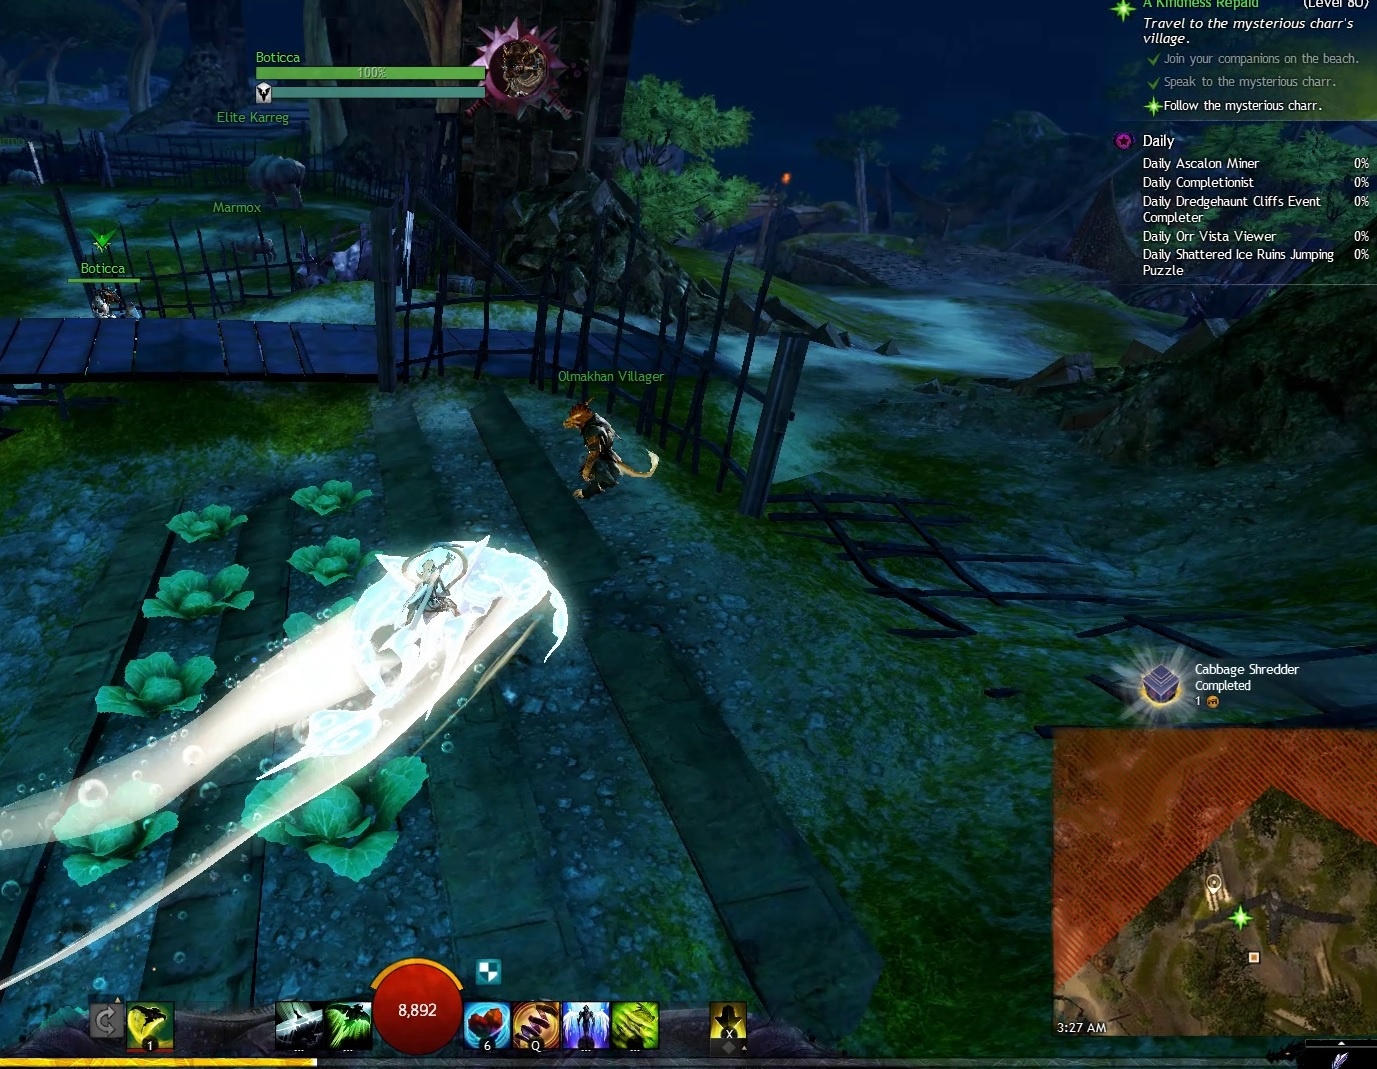
Cabbage Shredder – 1AP
Story Instance: A Kindness Repaid
When following the Mysterious Charr, run over a patch of cabbage on the way, can be on foot or in a mount. You will see the spot north of Malor’s Ranch – [&BDYLAAA=]

Impressionable Youth – 1AP
Story Instance: A Kindness Repaid
For this achievement you need to kill the Elite Sand Effigy that the children summon. The best way to do this is with a ranged weapon and run in circles around the effigy, avoid the short range shockwaves or you lose the achievement.


X-T3R-M1N-8 – 2AP
Story Instance: A Kindness Repaid
Defeat the Mark II Beta Exterminator under 3 minutes. Bring high DPS for this. First you need to kill the smaller golems to gain the special skill and use it on the boss to remove the Extreme Protection. Once you remove the four stacks the boss gets stunned and ejects the Unstable Exterminator Core. Burst it to transfer the damage to the boss when the core returns. You can start the fight with four charges of the special skill by getting it on the way, and once fighting the boss, grab an extra charge to add vulnerability constantly to the boss for more damage.


Stimulus and Response – 2AP
Story Step: The Road to Rata Primus
Solve the comms lab’s hive-mind experiment in only 3 steps. You can do this achievement during the story step but also outside if you didn’t get it the first time. The correct order to solve is: 1, 3, then 4. Be sure to wait for each shot before activate the next one.
- Start: off/on/on/off – on/on/on/on
- 1: on/off/on/on – off/off/on/on
- 3: on/on/off/off – off/on/off/off
- 4: on/on/on/on – on/on/on/on

A Branded Blast – 1AP
Story Step: The Road to Rata Primus
For this achievement, when you are taking the transport system in the Eastern Complex, you will encounter a Branded Wyvern that will breathe its attack from time to time. Stand in front and get hit to earn the achievement.


Faster Than Light – 1AP
Story Step: The Road to Rata Primus
Inside the Invariant Enclave Lab you need to activate the 4 door controls under 35 seconds, you can also try this achievement outside the story step (if you fail you can log out to reset the order and try again). Follow the steps below or watch the video on how to do it:
- 1 – First Platform: Press red button, then blue button and take the portal to second platform
- 2 – Second Platform: Activate the door, press the button and run back to first platform
- 3 – First Platform: Press red button, activate the door, and take the portal to third platform (don’t take it too fast, you have to wait until the turret shoots the exit portal to the correct location)
- 4 – Third Platform: Activate the door, press red button, take portal to fourth platform and activate the door
Inquest.Info – 1AP
Story Instance: The Charge
Find all the classified Inquest data in Rata Primus. There are a total of six documents to acquire, four of them are in the top level (red circles) and two in the bottom level (white circles) that you access as you progress the instance, check the map with locations below:


Saving Skritt – 1AP
Story Instance: The Charge
Find Subject S in the poisonous corridor and evacuate them to the airship. In the northwest corner of the lab, in the bottom level, you will see a series of pipes leading down to a poisoned corridor, pick up the skritt and mount up, using the mastery skill Bond of Life is needed to help you tank the damage while you escape to the airship.


Awake End – 2AP
Story Instance: The Charge
Prevent Lonai from killing or awakening any townspeople during the Divinity’s Reach phase of her fight. Focus on the Dying Star boulders to the death of citizens, and when Lonai tries to awaken dead bodies with the channeled attack, simply break the defiance bar (cc bar).


Map Achievements – 51AP – 4MP
Insuppressible – 3AP
Kill any Mark III Suppression Golem. these golems spawn in multiple spots around Rata Primus, and they aren’t hard to find.

Rescue Ranger – 1AP
Rescue all the skritt for Subject S on your way to the beach. The event is part of a chain that starts in Rata Primus and progresses to Northern Complex Coves. The one which gives you the achievement is the second “Escort Subject S to safety”.
- Free Subject S by destroying the shield generators
- Escort Subject S to safety
- Defeat all the laboratory security golems


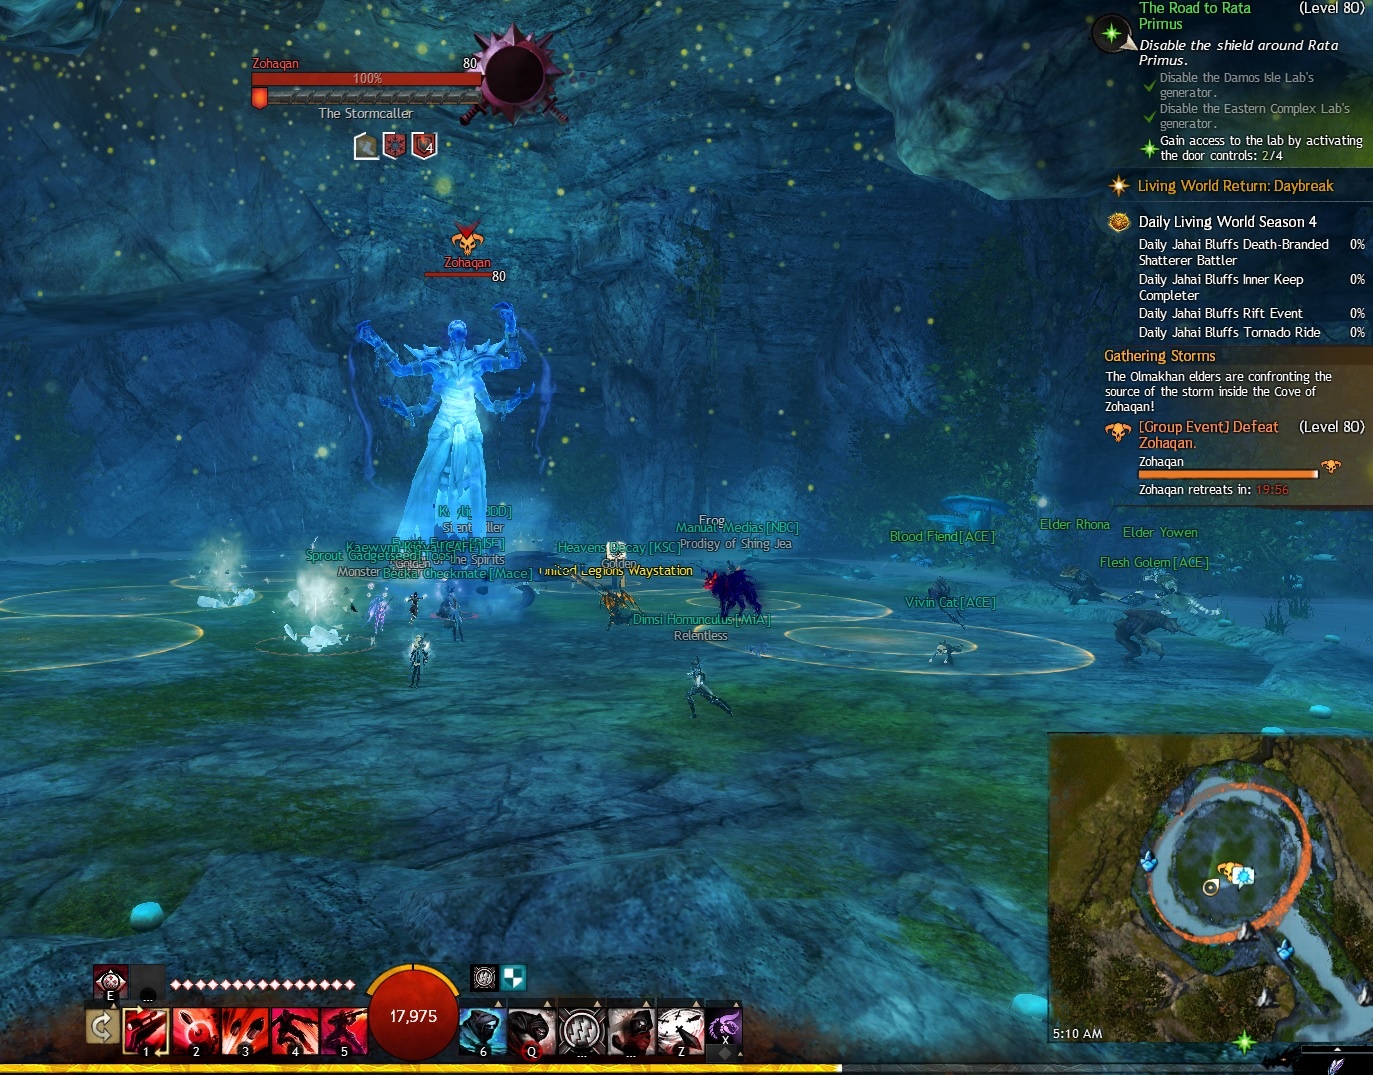
Stormbreak – 5AP
Defeat the champion djinn Zohagan in a cavern beneath the ruined paths. This is the final step of the meta-event called Gathering Storms and occurs in the underground cave at The Ruined Paths.
- Defeat the rampaging elementals!
- Destroy the stormcaller echoes
- Help Elder Rhona track down the source of the storm
- Defeat Zohaqan

The Queen and I – 3AP
For this achievement you need to kill Abiri, the Beetle Queen. There is a pre-event for this called “Defend livestock from the beetle stampede” that occurs on the farms northeast of the village of Atholma, then after completion Klan will head down to where the champion spawns.


The Specimen Chamber – 9AP
This is the other meta-event on the map. For the achievement you need to kill each boss on the Simulacrum Chamber at least once, this requires you to do the meta a couple of times since only two spawn each time and the order is random.
The meta will occur each 60 minutes after its last completion and the timer is instance based. It have five phases and are the following:
- Starts with a 15 minute countdown and once is finished, portals to the Specimen Chamber will spawn around Rata Primus
- Outside the chamber a defense event starts and last 7 minutes, once its completed the room will open
- Once inside the room, you need to fight against one random Simulacrum boss with a 15 minutes timer
- After the first boss is defeated, a second random Simulacrum will appear
- Then the final step, both bosses previously killed will spawn together with the “Syncronized Vitality” effect, sharing their health so you can focus each one of them.
So as mentioned earlier, there are a total of six bosses and only two spawn per meta-event and in random order, so you will need to run the event at least 3 times.


Three Golem Monte – 1AP
For this achievement you need to consecutively choose the correct golem in all rounds of the Golem Eye Exam event. The event is called “Participate in the daily motion vision assessment” and can occur in three different locations: Eastern Complex, Invariant Enclave or Western Complex.
It has 5 phases or rounds and each one becomes progressively harder. Essentially it is a game of memory. A bunch of golems will line up and one of them receives a lighting strike, remember which golem it is by following it’s movement and after they break formation and line up at random, pick up the correct golem and interact with it. If you pick the correct one you see a confetti animation, otherwise you will get knocked back. You need to do it correctly all 5 rounds to earn the achievement.


Wyvern Whacker – 3AP
Slay the champion Branded wyvern outside the Western Complex. At Cerberus Watchtowers – [&BEALAAA=] the event called “Defeat Dominus Crystallum” occurs and you will earn the achievement after defeating it. Getting there can be tricky if you don’t have a flying mount, use the Jackal sand portal atop Western Complex and then use the jump pads.


Honorary Olmakhan – 5AP
Defeat each of the prestige hunting targets in the Hunting Grounds. There are 5 targets to kill, they are on a 15-20 minute timer with a fixed location, check the map below:

Magnetic Attraction – 2AP
Collect all eight magneton particles floating in the Magnetics Lab. Enter from the west side behind the heart quest NPC by the stairs and pick up a Magneton Hammer. You will gain three skills and there are 8 Magneton Particles suspended in the air among Magneton Capacitors. You need to use the skill #1 with a Capacitor targeted to pull yourself toward a Magneton Particle, using the skill #3 to fall.
So the idea is using skill #1 to get close or higher than the particles and use skill #3 to drop down to the ground when you are right on top of them. Collect all 8 for the achievement.


Tales of Elona – 2AP
Talk to Ewyn at Ewyn’s Retreat – [&BCwLAAA=] and select the option to listen to the stories of the people he lost. Then you need to interact with the four memorials around to earn the achievement.


Sandswept Isles Bounty Hunter – 1AP
For this achievement you simply need to complete ONE bounty from each bounty board in the map. Sandswept Isles has 2 boards, at Atholma Waypoint – [&BEMLAAA=] and at Anniogel Encampment Waypoint – [&BCULAAA=]


Sandswept Isles Champion Hunter – 3AP
Defeat each champion bounty in the Sandswept Isles at least once. There are a total of 9 between the two boards. Remember the bounties can be a Joko Ambush and won’t count for the progress.
Sandswept Isles Legendary Hunter – 2AP
Defeat each legendary bounty in the Sandswept Isles at least once. There are two, Seneb the Descrated and Starcaller. Remember the bounties can be a Joko Ambush and won’t count for the progress.
Track Record – 1AP
For this achievement you need to complete both races in the Sandswept Isles, check the two following achievements for them.
Race to the Finish: Inquest Facility – 1AP
Finish the race around the Inquest facility in first, second, or third place. This is a Skimmer race that starts around the northern perimeter of Rata Primus.


Race to the Finish: Olmakhan Docks – 1AP
Finish the race around the Olmakhan village docks in first, second, or third place. This is a Skimmer race that occurs around Atholma.


Mastery Insights – 4MP – 4MP
Sandswept Isles Insight: Atholma – 1AP – 1MP
Interact with the Mastery Insight to earn the achievement. Climb to the peak of the rock and channel the Mastery Insight on the western side of Atholma in Sandswept Isles. Atholma Waypoint – [&BEMLAAA=]


Sandswept Isles Insight: Invariant Enclave – 1AP – 1MP
Interact with the Mastery Insight to earn the achievement. Channel the Mastery Insight south of the Magnetics Lab – [&BC0LAAA=] at the Invariant Enclave. Reach the floating platform by jumping to it with a Jackal from the top of the pyramid on the platform west of it.


Sandswept Isles Insight: Rata Primus – 1AP – 1MP
Interact with the Mastery Insight to earn the achievement. Swim to the bottom of the pool in the middle of Rata Primus and channel the Mastery Insight. Deepwater Cooling Sink – [&BDELAAA=]


Sandswept Isles Insight: The Hunting Grounds – 1AP – 1MP
Interact with the Mastery Insight to earn the achievement. Climb to the top of the statue at Olma’s Legacy – [&BD0LAAA=] in the Hunting Grounds using the Springer, then channel the Mastery Insight.


Adventures – 4AP
Crystal Corral: Gold – 1AP
This adventure occurs in Damos Isle, and you need to collect data crystals around the map. Speak to Veteran Defector Gliffu southwest of Rata Primus to begin. To get a gold medal you need to complete under 4:30 minutes, check the video below to know how to do it:
Crystal Corral: Silver – 1AP
Same as above, but for silver you need to complete under 5:30 minutes. Check the video above.
Sandswept Isles Griffon Expert: Gold – 1AP
This is a Griffon adventure and you need to complete it under 30 seconds for the Gold medal. You will need all masteries for this. Check the video below to know how to do it:
Sandswept Isles Griffon Expert: Silver – 1AP
Same as above, but for silver you need to complete under 1 minute. Check the video above.
Collections – 20AP
Lasting Bonds: Where We Come From – 3AP
Collect 6 items to help Efi. Once you complete the story, you earn a 20 slots bag, and with this collection you can earn another bag with 24 slots.
- Simple Olmakhan Bandolier
- Earned by completing the story episode “A Bug in the System.”
- We Carry Her Loss Together
- Turn in a simple Olmakhan bandolier to Efi, near the southern gate of Atholma.
- We Sing Her Story
- Speak with Lorekeeper Rhosan on the north end of Atholma.
- Laughter on the Wind
- Speak with Marlen near Jemandi Market.
- The Good We Do in Life
- Find Ewyn’s retreat to the east of Olma’s Legacy.
- Olmakhan Songbook
- Explore above the Specimen Chamber using your jackal.


Lasting Bonds: What We Do Here – 3AP (Hidden)
Collect 9 items to help Efi. Next step in the collection allow you to earn a bag with 28 slots.
- Handwoven Olmakhan Bandolier
- Awarded from Lasting Bonds: Where We Come From.
- “The Storm That Consumes All”
- Turn in a handwoven Olmakhan bandolier to Efi, near the southern gate of Atholma.
- Old Stonehoof’s Stone Hoof
- Defeat and collect the bounty for the gazelle Old Stonehoof.
- Ironshell’s Shell Fragment
- Defeat and collect the bounty for the karka Ironshell.
- Smashed Vase
- Defeat the Spirit of the Storm in the Ruined Paths.
- Artificial Diamond
- Defeat the elementals roaming the Hunting Grounds.
- Luminescent Seaweed
- Collect from driftwood that washes up after the storm.
- Nakis and Zohaqan’s Tree
- Find the location where Zohaqan would watch the sunrise.
- Inquest Manual on Choleric Elemental Energy
- Purchase from Researcher Thale near the Magnetics Lab.


Lasting Bonds: What Comes Next – 5AP (Hidden)
Collect 8 items to help Efi. Final step on the collection allows you to earn a bag with 32 slots.
- Pocketed Olmakhan Bandolier
- Awarded from Lasting Bonds: What We Do Here.
- “Hope for Tomorrow”
- Turn in a pocketed Olmakhan bandolier to Efi, near the southern gate of Atholma.
- Starcaller’s Aetheric Gland
- Defeat and collect the bounty for the legendary hydra Starcaller.
- Seneb the Desecrated’s Locket
- Defeat and collect the bounty for the legendary mummy Seneb the Desecrated.
- Nakis’s Bracelet
- Gain access to the Specimen Chamber and investigate it.
- Zohaqan’s Letter
- Found in a chest in the depths of a cave in the Whispering Grottos of Elon Riverlands.
- Olmakhan Bow of Force
- Defeat both bosses in the Specimen Chamber.
- “Shadow and Sun”
- Bring Mom’s Bow to Efi.


Repairing IG-6417 – 1AP
Acquire the parts to repair IG-6417. This collection is the first step for the Inquest backpack.


- Golem Right Arm
- Found as a drop from the Inquest throughout the map.
- Golem Left Arm
- Found as a drop from the Inquest throughout the map.
- Integrated Circuitry
- Award at the end of The Specimen Chamber meta event.
- Optical Sensor
- Drop from any bird, especially Moas.
- Gravitic Repulsion Unit
- Drop from the smaller floating golems.
- Holographic Display Unit
- Drop from the smaller floating golems.
- Golem Power Core
- Drop from Mark III Suppressor Golem.
Rebooting IG-6417 – 3AP (Time-Gated)
Download the software needed to repair IG-6417. This collection is the second step for the Inquest backpack and it’s time-gated, takes at least 7 days to complete. You need an Inquest passcode which is a random drop off the Inquest mobs in the area and you need it first before you can interact with any of the Inquest Terminals so just kill Inquest mobs until you get a drop.


- Module MV-337
- Through the Jackal portal South of Specimen Chamber. Can also be accessed through the wall of the chamber
- Module GP-739
- East of Communications Array
- Module HR-874
- South of Specimen Chamber
- Module ZN-290
- Southeast of Specimen Chamber
- Module JT-609
- Southwest of Specimen Chamber
- Module KL-411
- Southeast of Deepwater Cooling Sink
- Module XD-356
- Top of Leyfinder Research Facility, buried under tar on the eastern side
Once you have all modules, you can give them to IG-6417. However this is time-gated and he will only take one module per day. For the last module, IG-6417 won’t take it so you need to go to Hero-Tron in Lion’s Arch and exchange XD-356 for a Revised Module XD-356.


Redeeming IG-6417 – 5AP
Upload recordings to teach IG-6417 how to be heroic. Must have the recording devices purchased from Researcher Thale at the Magnetics Lab Renown Heart in your inventory when performing these actions, one device per action. You can perform the actions in any order, but you must upload them in the order below.


- Cadet Rescue Recording
- Complete the event “Break the water djinn’s magical influence over the transformed cadets and defeat him” in the Vehtendi Academy in Domain of Vabbi every 40 minutes of the hour.
- Hostage Rescue Recording
- Complete the event “Kill Gatekeepers and take their keys to free hostages” in the Salt Flats of Desert Highlands.
- Skritt Rescue Recording
- Complete the event “Escort Subject S to safety” in Rata Primus in Sandswept Isles.
- Zephyrite Rescue Recording
- Complete the event “Rescue refugees forced into labor in the Zephyrite mine” at Glint’s Legacy in the Crystal Oasis.
- Deadhouse Rescue Recording
- Complete the event “Free Emara and defeat Warden Jabari” at the Deadhouse in Elon Riverlands. This is after the escort event starting from the town to the North.
- Vanquish Wyvern Recording
- Defeat Dominus Crystallum by starting the event talking to Agent Kashud in the Griffonstone Buttresses in Sandswept Isles.
- Vanquish Branded Recording
- Complete the final event of the Domain of Vabbi meta “Defeat Ysshi Hessani and Pek Rakt Grag” at the Grand Court of Sebelkeh.
- Grave Defiler Recording
- Complete the event “Stop the Mordant Graveraiser from defiling graves to raise new Awakened” at the Vulture Drifts in Elon Riverlands.
- Refugee Healing Recording
- Heal refugees as part of the renown heart in the Temple of Kormir in Crystal Oasis.
- Medical Aid Recording
- Revive ten other players while having a recorder in your inventory.
- Fisher Recording
- Complete the event “Catch as many fish as you can!” on the beach East of Atholma in Sandswept Isles.
- Amnoon Refugee Recording
- Complete the event “See the refugees safely through to Amnoon” starting near Kusini Crossing in Crystal Oasis.
- Swindler Recording
- Complete the event “Help Flint deal with the swindlers in First Camp” at First Camp in Elon Riverlands.
- Grave Defense Recording
- Complete the event “Defend the village of Kweli from the Forged” North of the bridge of the Temple of Kormir in Crystal Oasis.
- Kormir Defense Recording
- Complete the event “Stop the Zaishen from desecrating the Temple of Kormir” in Crystal Oasis.
- Olmakhan Defense Recording
- Defeat Zohaqan during the final part of the event chain in the Ruined Paths of Sandswept Isles.
- Elonian Defense Recording
- Defeat any one of the three high judges after the event “maintaining order to help the court reach rulings on the Vabbian dead” in The Necropolis in the Domain of Vabbi.
- Villager Defense Recording
- Complete the event “Defend the captive villagers from the garrison’s Awakened until Zuri returns with weapons” in The Desolation, at the Bonestrand Garrison.
- Burglar Recording
- Complete the event “Stop the caffeinated skritt burglar before it escapes with the treasure” which can occur at any of the five Path of Fire maps.
- Lost Supply Recording
- Complete the event “Help Explorer Jeppa recover lost supplies” at the top of Brightwater Inlet in the Desert Highlands.
- Extortion Recording
- Complete the event “Stop the Awakened collectors from harassing the exiles” at the Arid Gladefields in the Elon Riverlands.


