

GW2. A complete achievements guide of The Silverwastes map in Maguuma Wastes. Living World Season 2.
The Silverwastes (General)

The Silverwastes
The silverwastes is a map that works around a big meta-event with four parts, and most of the achievements revolve around it. So first I need to explain how the map works.
Foothold
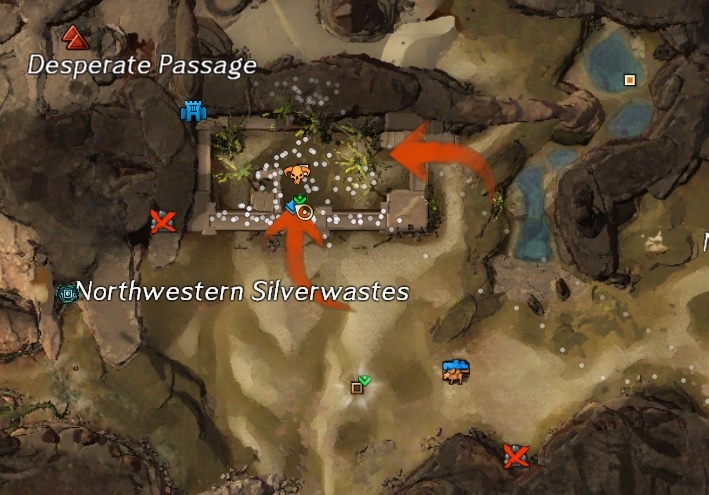
You can see in the events UI the progress of the event called “Foothold” which shows the level of defense of most forts as well.
The map has four forts which are: “Red Rock Bastion”, “Indigo Cave”, “Amber Sandfall”, and “Blue Oasis” that players need to capture and fortify.


Once all the forts are captured, players need to increase their defenses by escorting supply and completing defense events against Mordrem. There is a chance to spawn a legendary boss to aid the Mordrem assault. Each boss will always spawn near the same fort.
Once the bar is full, all the forts are immediately captured by Mordrem again and The Breach begins.
The Breach
During “The Breach”, five mordrem champions will spawn underneath each fort. These champions are named “Copper”, “Iron”, “Silver and Gold” (spawn together), and “Platinum”. Players will need to defeat them all under the 5 minutes timer by jumping inside the holes within the forts. The rewards will be based on the number of champions defeated.


Once all 5 bosses are dead or the timer on The Breach ends, you’ll enter the third part, the Vinewrath event. Success in killing all 5 of the mordrem champions during The Breach will give you an extra Key of Greater Nightmares for use in the fourth part of the meta event.
Mordrem Vinewrath
Right after The Breach, players have 3 minutes to organize themselves to fight the “Mordrem Vinewrath”. This event occurs all the way at the west end of the map where players must split between three lanes and escort siege carriers down the lane to destroy Vine Walls and clear the way to the Vinewrath. These carriers have limited ammunition and will walk back and forth to pick up more. The ammunition needs to be defended as well and players can rebuild it by gathering pieces around.


While defending the carriers, one lane will go in to fight the vinewrath at a time, starting with the bottom (southern) lane, and then proceeding to the middle and top (northern) lane. Escorting the siege carrier to the final vine wall will open the path to the Vinewrath. Players should rush inside the lair to fight one of the three champions. Each boss has a specific mechanic that you will need to watch your surroundings for. After participating in a boss fight, players gain a debuff, “Tracked”, that prevents them from entering the boss area for a short time. Essentially they can participate in every other boss fight.
The event is complete once each of the three champions are defeated, and there is a time limit for each champion. If a lane fails to defeat a champion, the boss will destroy all active siege carriers and reset the lanes, making the next lane responsible for killing their champion. The event will fail if 15 siege carriers are destroyed.
Time Out
Completing the Vinewrath and the The Breach will reward you with a Key of Greater Nightmares each which you can use in The Labyrinth – [&BJ4HAAA=] to open the Greater Nightmare Pod in the middle of the labyrinth. The Tangled Labyrinth is only accessible during this event; opening 2 minutes after it starts and closing 1 minute before it ends. You can collect more key fragments to use in the center by running around and avoiding the invulnerable mobs in the labyrinth.

This lasts for 18 minutes, then the cycle starts again with Foothold.
Map Achievements
Silverwastes Shoveler – 2AP
For this achievement you need to use a Silverwastes Shovel to uncover a lost bandit chest. You will get these shovels mostly by completing events. The bonus chests will award them as well as some of the loot bags from the map like “Arid Dusty Satchel” and “Champion Mordrem Troll Cache”.
These shovels are part of the main farm on The Silverwastes, because once one person uncover a chest, everybody else can loot it by using a Bandit Skeleton Key which you can buy from the vendor NPCs with Bandit Crests (a currency that you get by completing events) or from some loot bags as well.
When equipped, the shovel will have 2 skills, #1 to dig, and #2 to locate nearby chests. Once you equip the shovel it cannot return to your inventory so you have to use it or after a few minutes it will expire.
Here is a full map with all the chests locations in case you join an organized group of treasure hunters called a “shovel train”.


Ambassador’s Aid – 3AP
To get this achievement you need to complete the event “Drive the bandits out of skritt territory” that happens in Picaroon Scratch – [&BLAHAAA=] . This event will also open the skritt tunnels throughout The Silverwastes and open the gate down leading to the jumping puzzle area. When the event succeeds and the tunnels are open, another event will happen called “Protect Rikker from bandit raiders”, this one won’t give you the achievement, so if you missed the achievement you need to fail this one and then complete the event 10 minutes later to drive the bandits out.
This achievement will reward you with a “Boot Requisition Order” which is necessary to buy Carapace Boot Boxes from the NPCs for your account.


Mercantile Mercenary – 10AP
Donate a total of 25 Bandit Crests to the mercenary requisitioner at Camp Resolve. Very simple achievement, there is an event at the camp called “Donate bandit crests to requisition additional camp services”, this event can only be started after all four forts are under the Pact control, the requisitioner takes 1 minute to spawn.


Retrospective Runaround – 10AP – 1MP
This achievement is earned by completing the Drydock Scratch jumping puzzle. You can access from Picaroon Scratch – [&BLAHAAA=] , go down the stairs along the eastern wall and then west through the cave until you reach Drydock Grotto Waypoint – [&BLoHAAA=] . If the gate at the stairs is closed and you do not have the waypoint unlocked yet, you will have to complete the event, check the achievement “Ambassador’s Aid” for it.
Here are two videos on how to complete the jumping puzzle and at the same time earn the next achievement which are the Diving Googles at the end of it. The first shows how to complete the puzzle as it was intended without mounts or gliding, and the second shows the faster way with the skyscale. If you want to unlock mounts, check out the guides for them HERE.
WITHOUT MOUNTS
Credit to Vallun for the video.WITH MOUNTS
Credit to morris 2934 for the video.Dive Master: Drydock Scratch – 5AP
After completing the jumping puzzle, continue along the ledge to the right of the chest, and you will find a skritt hole beside a plank, once you enter the tunnel it transports you to a rock high above the ship, walk forward and grab the diving googles, you will need to jump all the way down and land in a section with water. Check out the videos of the jumping puzzle above to see how to get both at same time.


Foothold Achievements
Defender Achievements
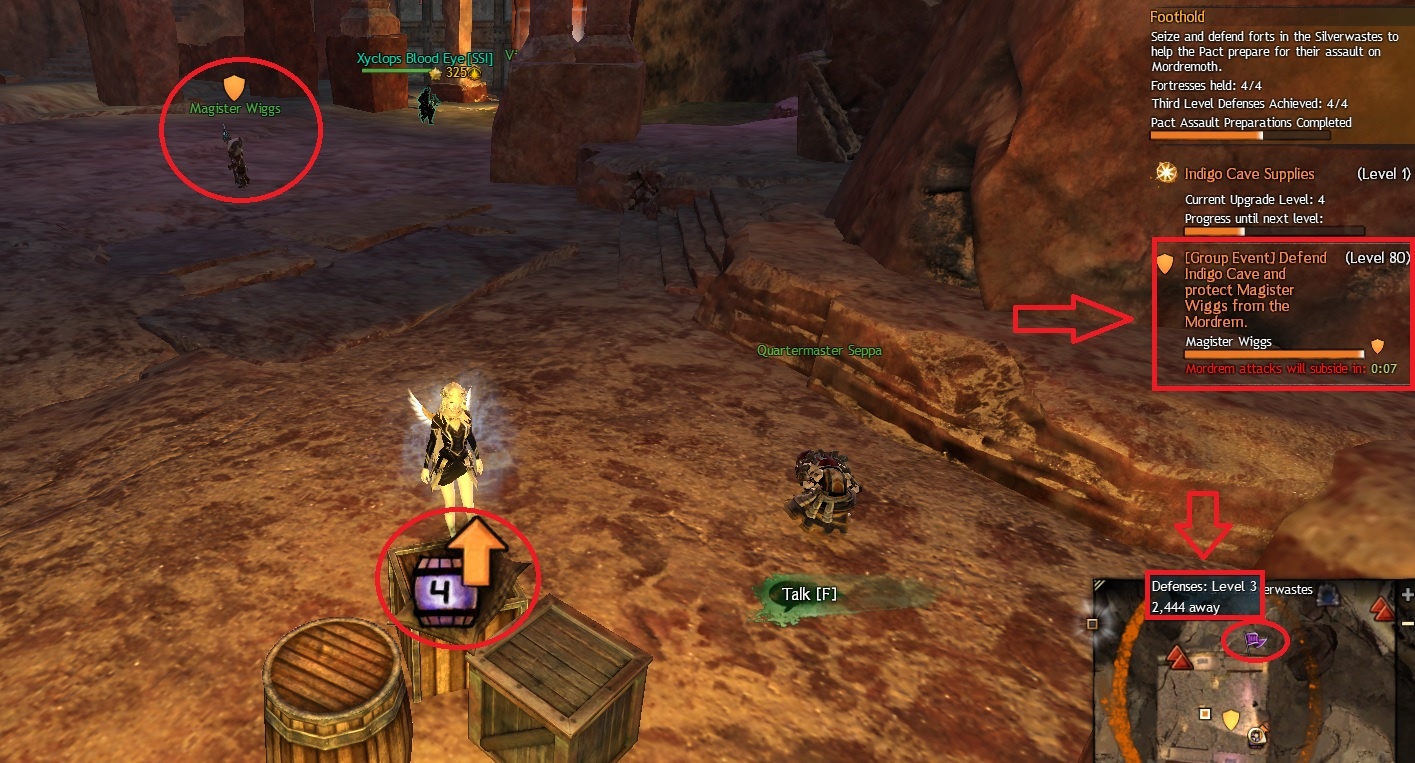
Defender: Indigo Cave – 5AP
Participate in a defense event against the Mordrem after Indigo Cave fort is under the Pact control and upgraded to defenses level 3. You can check the fort defense levels by hovering on the icon on the map.
Defender: Amber Sandfall – 5AP
Participate in a defense event against the Mordrem after Amber Sandfall fort is under the Pact control and upgraded to defenses level 3. You can check the fort defense levels by hovering on the icon on the map.
Defender: Blue Oasis – 5AP
Participate in a defense event against the Mordrem after Blue Oasis fort is under the Pact control and upgraded to defenses level 3. You can check the fort defense levels by hovering on the icon on the map.
Defender: Red Rock Bastion – 5AP
Participate in a defense event against the Mordrem after Red Rock Bastion fort is under the Pact control and upgraded to defenses level 3. You can check the fort defense levels by hovering on the icon on the map.
Legendary Bosses
These can be really hard to find, you should pay attention to mapchat if someone say about their spawn or just camp the spot until they appear.


The Annihilator – 10AP – 1MP
Defeat the Legendary Mordrem Annihilator boss who rarely appears around the Red Rock Bastion fort.
It has a low chance to appear during any defense event, at any time during the Foothold meta-event, it does seem to have higher chances to spawn when the fort defenses are at least level 3, and if you are focusing on one legendary you can just camp at this fort. It spawns on the western side of Red Rock Bastion. You earn the title “The Annihilator”.
The Demolisher – 10AP – 1MP
Defeat the Legendary Mordrem Demolisher boss who rarely appears around the Indigo Cave fort.
Like all other Legendary Mordrem, it is a rare spawn, so camp this specific fort to make sure you don’t miss them. It spawns on the north side of Indigo Cave. You earn the title “The Demolisher”.
The Executioner – 10AP – 1MP
Defeat the Legendary Mordrem Executioner boss who rarely appears around the Amber Sandfall fort. Like all other Legendary Mordrem, it is a rare spawn, so camp this specific fort to make sure you don’t miss them. It spawns on the north side of Amber Sandfall. You earn the title “The Executioner”.
The Tormentor – 10AP – 1MP
Defeat the Legendary Mordrem Tormentor boss who rarely appears around the Blue Oasis fort.
Like all other Legendary Mordrem, it is a rare spawn, so camp this specific fort to make sure you don’t miss them. It spawns on the south side of Blue Oasis. You earn the title “The Tormentor”.
The Be-All and the End-All – 15AP – 1MP
This achievement is earned once you defeat all four Legendary Mordrem listed above. You earn the title “The Be-All and the End-All”.
The Breach Achievements
Copper – 5AP
During The Breach you need to defeat the Champion Mordrem Husk Copper. This champion spawns beneath the Red Rock Bastion fort. During the fight it will keep summoning Mordrem Husk Offshoots, at 80% health large poison bubbles will spawn from each corner of the room, at 20% health small poison bubbles will spawn throughout the room, be aware these bubbles will heal the champion if they are destroyed right next to it. This champion has high resistance to direct damage but it’s vulnerable to conditions.


Iron – 5AP
During The Breach you need to defeat the Champion Mordrem Troll Iron. This champion spawns beneath the Amber Sandfall fort. It lobs five slow projectile blobs of honey spread out across a line, each one dealing damage in an area of effect and summoning an Insect Swarm upon landing. At 80% health it summons three Veteran Trolls and uses the “Spittle” skill spitting in a frontal area of effect attack every half second once in each direction (going counter-clockwise). Each of these attacks cripple and knock back. At 40% health it revives any veteran trolls that died and uses the “Bee Storm” skill creating three different area of effect attacks one after another. At 20% health it revives trolls that died again and summons three additional veterans. The Swarms can be reflected, creating allied Insect Swarms where they land that damage the troll and its minions. The only essential strategy is to be aware of your position and the AoE circles on the ground.


Platinum – 5AP
During The Breach you need to defeat the Champion Mordrem Thrasher Platinum. This champion spawns beneath the Blue Oasis fort. This boss is in a room with four sections, during the fight it will go invulnerable and teleport to the next section clockwise. When the Poisonous Vents it creates are destroyed the thrasher flies in a circle and consumes 5 stacks of Poisonous Buildup to cast a high damage area of effect attack. For the majority of the fight, single-target DPS is essential, as the poison bubbles heal Mordrem when popped. Reflect skills are also essential for doing large amounts of damage when Platinum is doing its spinning poison attack.


Silver and Gold – 5AP
During The Breach you need to defeat the Champion Mordrem Teragriff Silver and the Champion Mordrem Teragriff Gold. These champions spawn together beneath the Indigo Cave fort. During the fight these Terragriffs will do their “Charge” attack going around the circular room, when they meet, they perform a combined powerful and very wide AoE attack which can easily down any player in range of the attack. Avoid trying to damage them unless you do the mechanic which is to use the Poison Bubbles (Gas Bubbles) around the room, just pop them right next to each champion to stun them for about 10 seconds allowing players to damage them.


Vinewrath Achievements
Vinewrath Vanquisher – 10AP
To earn this achievement simply complete the meta-event and defeat the Mordrem Vinewrath for first time.
Devourer Protector – 1AP
You will earn this achievement once you participate in the south lane event and successfully defend the Devourer Siege Carrier on its way to the final vine wall. “Protect the siege carrier and its ammunition (south)”.

Arboreal Protector – 1AP
You will earn this achievement once you participate in the north lane event and successfully defend the Arboreal Siege Carrier on its way to the final vine wall. “Protect the siege carrier and its ammunition (north)”.

Golem Protector – 1AP
You will earn this achievement once you participate in the central lane event and successfully defend the Golem Siege Carrier on its way to the final vine wall. “Protect the siege carrier and its ammunition (central)”.

Beekeeper Crusher – 2AP
Defeat the Champion Mordrem Beekeeper, this is the first boss. It attacks with honey and bees. One of the AoE attacks is a donut shaped AoE with a safe area inside the ring. Standing inside the safe area coats the players in bees, which can then be used to build a beehive inside the room. When the Beekeeper retreats towards the flower, players will need to stand behind the beehive to line of sight the damage by the large beam attack. Be careful of the smaller Mordrem trolls who will knock you out of the safe spot behind the beehive, causing you to take massive damage from the beam attack.


Covered in Bees! – 5AP
For this achievement you need to build and use the beehive during the fight with the Champion Mordrem Beekeeper, and avoid taking damage from the Vinewrath beam attack.


Mangler Wrangler – 2AP
Defeat the Champion Mordrem Mangler, this is the second boss. The Mangler is a thrasher, and will frequently use a poison projectile attack, which can be reflected similar to Platinum. It will also do AoE attacks that inflict Torment. Around the room are pustules which can be attacked and killed for a buff. This buff reduces damage taken, while increasing damage done to the Mangler, allowing Mangler to be killed quickly. Like the Beekeeper, Mangler will retreat towards the flower, you must stand inside a small white cone next to the Mangler to get the effect “Shaded” which will prevent you from getting the “Mesmerized” effect which is a 15 seconds unremovable stun, which basically means that you die. If the pustules aren’t killed in time, the Mangler’s poison projectile will hit them, causing large AoE poison fields which are harder to avoid.


Don’t Look Now – 5AP
During the fight with the Champion Mordrem Mangler you need to do the intended mechanic and stand in the white cone next to the Mangler to avoid getting stunned (Mesmerized effect).


Dark Wing Defoliator – 2AP
Defeat the Champion Mordrem Dark Wing, this is the third and final boss. Dark Wing charges around in circles, and does various other Terragriff attacks. Triggerblossoms spawn around the room, which will need to be attacked to spawn a flower. When Dark Wing retreats, players will need to stand on top of the flower to avoid the large AoE, which will cause instant downing. Players with good timing can also dodge the large attack without standing on the flower.


Jump Up to Get Down – 5AP
Basically you need to do the intended mechanic while fighting the Champion Mordrem Dark Wing to avoid the damage from the Vinewrath beam attack. Attacking the Triggerblossom can cause a flower called “Plant Debris” to appear. Standing on the flowers provide the “Elevated” effect which prevents players from being instantly downed when the Vinewrath attacks and you will get the achievement.


Time Out Achievements
Fear No Evil – 10AP
Two minutes after the Vinewrath event is completed, at the 16 minute mark on the “Time Out” meta-event, the Hidden Depths opens up, accessed through an unlabeled skritt tunnel just southwest of Red Rock (the labeled tunnel goes to Northern Silverwastes), or by using the Hidden Depths Waypoint – [&BKwHAAA=] . Inside the Depths, players can run around the labyrinth opening Lesser Nightmare pods, to gather loot and Nightmare Essences. You can combine 25 of these essences with a Bandit Skeleton Key for a “Key of Greater Nightmares” which is needed to open the Greater Nightmare pod in the middle of the labyrinth. The achievement is awarded when you open the Greater pod, and since you can get the Key of Greater Nightmares as reward from completing the previous meta-events like “The Breach” and “Vinewrath” you may go directly for it (be careful with the Lurcher).


Collections
Go for the Gold – 30AP – 1MP
This achievement requires you to find and collect 30 Gold Lost Badges which can be found mostly underground in The Silverwastes. For this I recommend to follow this video guide:
Credit to Dulfy for the video.Lost Badges – 30AP
This achievement requires you to find and collect 30 Lost Badges which can be found throughout The Silverwastes. For this I recommend to follow this video guide:
Credit to Dulfy for the video.Luminescent Armor

3 Comments
I love this guide! Thank you!
Hola qué tal me encanta su página, quiero hacer una consulta por qué ahora no puedo obtener la insignia perdida de oro número 4 se a bugeado??
Si podes ver aqui en el foro lo reportaron tambien: https://en-forum.guildwars2.com/topic/131190-go-for-the-gold-golden-badge-4-is-inaccessible/